Create a simple video test environment (Part 2)

In the first part we created the video test environment and you learned how to extend it. At the end of this tutorial you will know how to embed video content in the video test environment. Therefore, a few basics are shown around ffmpeg (how to create, edit and use videos).

Record and prepare some videos

The recording should contain video and sound and should be 5 minutes long. The content of the video does not matter!

# open Quicktime Player
$ open -a "QuickTime Player"

# press Control-Command-N, start record (approximately 5 min)
# save record into project folder as movie.mov (~/Projects/VideoTest/movie.mov)

As soon as a video is ready we have to create more.

# copy binary (optional)
$ sudo cp ~/Projects/VideoTest/ffmpeg /usr/local/bin/ffmpeg && sudo chmod a+rx /usr/local/bin/ffmpeg

# convert mov into mp4 (copy)
$ ffmpeg -i movie.mov -vcodec copy -acodec copy demo.mp4

# resize mp4 to 320x240 (filter_graph)
$ ffmpeg -i demo.mp4 -vf scale=320:240 ./src/demo_scaled.mp4

# create poster from mp4 (position and frame)
$ ffmpeg -i ./src/demo_scaled.mp4 -ss 00:00:30 -vframes 1 ./src/demo_poster.png

# create m3u8/ts files from mp4 (HLS - Apple HTTP Live Stream)
$ ffmpeg -i demo.mp4 -b:v 1M -g 60 -hls_time 2 -hls_list_size 0 -hls_segment_size 500000 ./src/output.m3u8

# run specific SHELL provisioner
$ vagrant provision --provision-with video

Note: After this step you will have many video files which you will use

  • ./movie.mov (original)
  • ./demo.mp4 (converted)
  • ./src/demo_scaled.mp4 (converted and resized)
  • ./src/output.m3u8
  • ./src/\*.ts

Get in contact with ffmpeg

I assume that ffmpeg is properly installed and the test environment is running.

# create target folder
$ mkdir ~/Projects/VideoTest/test

# extract some images from video
$ ffmpeg -i movie.mov -ss 00:00:30 -t 0.1 -f image2 -qscale 2 -vcodec mjpeg ./test/img-%03d.jpg

# create local m3u8/ts files from mp4
$ ffmpeg -i demo.mp4 -b:v 1M -g 60 -hls_time 2 -hls_list_size 0 -hls_segment_size 500000 ./test/output.m3u8

# extract mp4 from local m3u8/ts files
$ ffmpeg -i test/output.m3u8 -bsf:a aac_adtstoasc -vcodec copy -c copy -crf 50 ./test/output_local.mp4

# extract mp4 from url to m3u8 file (will not work with LiveStream)
$ ffmpeg -i http://localhost:8080/output.m3u8 -c copy -bsf:a aac_adtstoasc stream.mp4

Stream videos

# open browser
$ open -a Safari http://localhost:8080/livestream.html

# stream video (Real-Time Messaging Protocol)
$ ffmpeg -re -i demo.mp4 -vcodec libx264 -vprofile baseline -g 30 -acodec aac -strict -2 -f flv rtmp://localhost/show/stream

Stream from FaceTime HD Camera (macOS)

# open browser
$ open -a Safari http://localhost:8080/livestream.html

# list devices
$ ffmpeg -f avfoundation -list_devices true -i ""

# stream sound and video (Real-Time Messaging Protocol)
$ ffmpeg -f avfoundation -framerate 30 -i "0:0" -pix_fmt yuv420p -vcodec libx264 -vprofile baseline -g 30 -acodec libmp3lame -f flv rtmp://localhost/show/stream

Create a simple video test environment

In this series I would like to clarify the following questions. How can you test local videos and videos provided by a server? What tools are there? How could the test environment look like? … So these tutorials should provide an entry into the subject of video testing. In this part, we will provide the test environment.

Specification

additional Software

Files

# create project
$ mkdir -p ~/Projects/ && cd ~/Projects/

# clone all files from repository
$ git clone https://github.com/Lupin3000/VideoTest.git

# change directory
$ cd ~/Projects/VideoTest

Project Structure

$ tree .
├── src
│   ├── directstream.html
│   ├── index.html
│   ├── livestream.html
│   ├── nginx.conf
│   └── simplevideo.html
└── Vagrantfile

Prepare and run your test environment

The test environment will created by Vagrant. The Vagrant Base box needs to be provided with Debian 9. Therefore you have now 2 options. You can use a Debian 9 Base box from Vagrant cloud or you create your own. To create your own Debian 9 Base box you can use my Packer Git repository.

Please ensure, that the  Vagrantfile is properly configured (config.vm.box_url, config.vm.box) before start-up environment.

# modify Vagrantfile (box name)
$ vim Vagrantfile

# start new environment
$ vagrant up --provision-with install,prepare,start

# open in browser
$ open -a Safari http://localhost:8080/

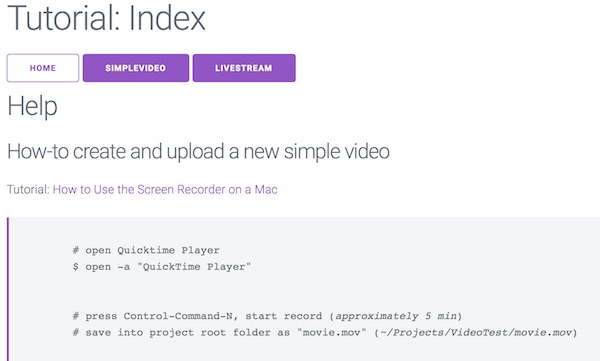
After successful start you will find some informations on start page about How-to create, modify, upload and stream videos. In second tutorial we will have a detailed look on it.

StartPage Video Test Environment

To understand the background somewhat better, take a look!

# tail nginx log files (optional)
$ vagrant ssh -c 'sudo tail -f /usr/local/nginx/logs/*.log'

# show content of directory (optional)
$ vagrant ssh -c 'sudo ls -la /tmp/hls/'

Develop some more

There are even more ways to publish video files (Media Streaming Server). You can easily expand the environment. Just customize/create the configurations and files in the “src” folder as well as the Vagrantfile. For Dynamic Adaptive Streaming over HTTP (DASH) support take a look here. This link opens the commercial software solution.

Note: You simply link the IDE with the “src” folder. To change the images and videos, just run vagant provisioner.

# run specific SHELL provisioner (video)
$ vagrant provision --provision-with video

# restart after configuration
$ vagrant up --provision-with stop,prepare,start

Download and install ffmpeg binaries on macOS

Currently official ffmpeg packages are available for Windows, Linux (Debian, Ubuntu, Fedora, RedHat) and macOS. You can download latest versions here.

Here now a solution for macOS users, if you don’t like to install many additional software on your system (static FFmpeg binaries).

# download ffmpeg
$ curl -C - -k https://evermeet.cx/ffmpeg/ffmpeg-3.3.3.7z -o ~/Downloads/ffmpeg-3.3.3.7z

# install debian package
$ vagrant ssh -c 'sudo apt install -y p7zip-full'

# copy archive (into shared folder)
$ cp ~/Downloads/ffmpeg-3.3.3.7z ~/Projects/VideoTest/src/

# unzip archive
$ vagrant ssh -c '7z x /home/vagrant/src/ffmpeg-3.3.3.7z'

# mv binary into src
$ vagrant ssh -c 'mv /home/vagrant/ffmpeg /home/vagrant/src/ffmpeg'

# delete archive (on shared folder)
$ rm ~/Projects/VideoTest/src/ffmpeg-3.3.3.7z

# mv binary into project folder (from shared folder)
$ mv ~/Projects/VideoTest/src/ffmpeg ~/Projects/VideoTest/

# ensure binary is executable
$ chmod +x ffmpeg

Now some basic ffmpeg commands, which should work now. If you like,you can move the binary into directory “/usr/local/”.

# show version
$ ~/Projects/VideoTest/ffmpeg -version

# show help
$ ~/Projects/VideoTest/ffmpeg -help

# list codecs
$ ~/Projects/VideoTest/ffmpeg -codecs

# list formats
$ ~/Projects/VideoTest/ffmpeg -formats

Okay, that’s it for first tutorial.

CURL visualization via httpstat

CURL is awesome … but sometimes the feature for visualization of statistics is missing. Exactly here helps httpstat as an wrapper.

httpstat is available for different languages:

Prepare project

Since I am a Python lover I will also work with my favorite language provided by Xiao Meng. It’s a single file with no dependencies and compatible to Python 2.7 and 3.

# create project folder
$ mkdir -p ~/Projects/httpstat && cd ~/Projects/httpstat

# download python script
$ curl -C - -O https://raw.githubusercontent.com/reorx/httpstat/master/httpstat.py

# change file permission
$ chmod u+x httpstat.py

Usage examples

# show help
$ python httpstat.py --help

# show simple GET statistics
$ python httpstat.py -k https://softwaretester.info/

# show html body (truncated)
$ export HTTPSTAT_SHOW_BODY=true
$ python httpstat.py -k https://softwaretester.info/

# show download and upload speed
$ export HTTPSTAT_SHOW_SPEED=true
$ python httpstat.py -k https://softwaretester.info/

Note: httpstat has a bunch of environment variables, please use help!

Fingerprinting with Spaghetti

In this tutorial I would like to introduce Spaghetti. Spaghetti is a cool project by m4ll0k on GitHub written in Python with less dependencies. The main idea behind Spaghetti is to find out fingerprints from Server, Web Frameworks, WAF, CMS, OS and languages. The following tutorial will show you how to set up and use spaghetti quickly and easily.

Requirements

  • Python (2.7.x)
  • Virtualenv

Prepare Project

# create directory
$ mkdir -p ~/Projects/Spaghetti && cd cd ~/Projects/Spaghetti

# create makefile
$ vim Makefile
VIRTUALENV_DIR = .env

.PHONY: destroy

CURRENT_DIR := $(shell pwd)
INTERPRETER = $(CURRENT_DIR)/$(VIRTUALENV_DIR)/bin
PATH := ${PATH}:$(INTERPRETER)/

help :
	@echo "Usage: $ make <target>"
	@echo " > create    : create project"
	@echo " > destroy   : destroy project"

create :
	@echo "[RUN]: clone from git"
	@git clone https://github.com/m4ll0k/Spaghetti.git
	@make env

destroy :
	@echo "[RUN]: destroy project"
	@rm -fr ./$(VIRTUALENV_DIR)/
	@rm -fr ./Spaghetti/

env :
	@echo "[RUN]: create virtualenv"
	@virtualenv $(VIRTUALENV_DIR) && \
	. $(VIRTUALENV_DIR)/bin/activate
	@make deps

deps :
	@echo "[RUN]: install dependencies"
	@$(INTERPRETER)/pip install -r $(CURRENT_DIR)/Spaghetti/requirements.txt

Usage

# create project
$ make create

# create alias
$ alias spaghetti="~/Projects/Spaghetti/.env/bin/python ~/Projects/Spaghetti/Spaghetti/spaghetti.py"

# check alias is created (optional)
$ compgen -a | grep 'spaghetti'

# show help
$ spaghetti --help

# run full scan with random agent and verbose mode
$ spaghetti --url http://google.ch --scan 0 --random-agent --verbose

# remove alias
$ unalias spaghetti

# destroy everything
$ make destroy

Docker for Mac with insecure private registry

Sometimes you need an own Docker registry for testing purpose. Here a simple way to setup and use a private insecure registry. For production – don’t do that!

Requirements

Create insecure repository

SSH into your dedicated server…

# create directory
$ mkdir /opt/registry-data

# run docker registry
$ docker run -d --name registry --restart=always -p 5000:5000 -v /opt/registry-data:/var/lib/registry registry:2

# verify container run (optional)
$ docker ps -a

# logout
$ exit

Configure Docker for Mac

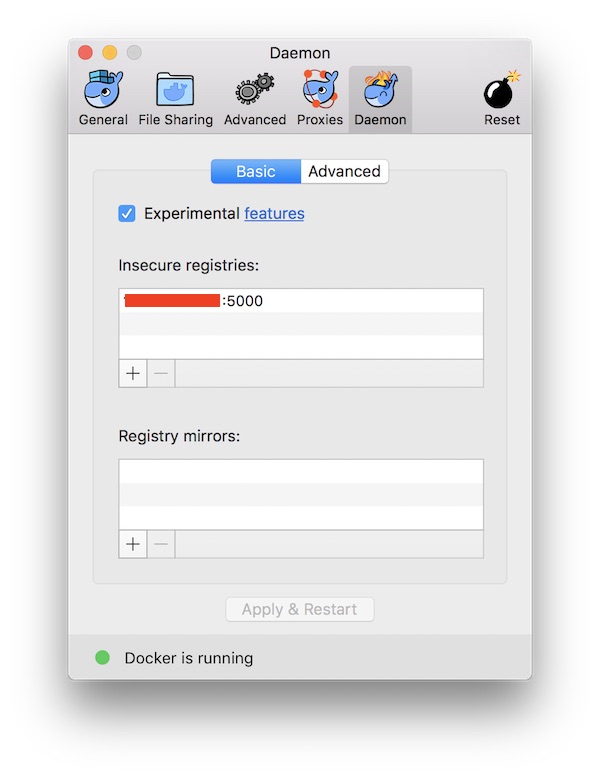
Start Docker for Mac and open “Preferences” – “Daemon”. Here just insert the IP plus specific port. When you are done press “Apply and Restart” button.

Docker for Mac Insecure registry

Build new image, tag and push

Create a new Dockerfile.

FROM alpine:latest

# install needed packages
RUN apk --update add wget

# download archive
RUN wget -q --no-check-certificate https://storage.googleapis.com/shellcheck/shellcheck-latest.linux.x86_64.tar.xz

# unzip archive
RUN tar xvfJ shellcheck-latest.linux.x86_64.tar.xz

# move binary
RUN mv /shellcheck-latest/shellcheck /usr/local/bin/shellcheck

# cleanup
RUN apk del wget
RUN rm -f shellcheck-latest.linux.x86_64.tar.xz
RUN rm -fr shellcheck-latest/

# change to mount directory
WORKDIR /mnt

# set entrypoint
ENTRYPOINT ["/usr/local/bin/shellcheck"]

Now build the image, tag the image and push to your private registry.

# build image
$ docker build -t alpine/shellcheck .

# tag image
$ docker tag alpine/shellcheck <IP>:5000/shellcheck

# push to private registry
$ docker push <IP>:5000/shellcheck

Use insecure registry

# remove all local images
$ docker rmi alpine/shellcheck
$ docker rmi <IP>:5000/shellcheck

# pull image from private registry
$ docker pull <IP>:5000/shellcheck

# list images (optional)
$ docker images

Additional

You can see the images stored on your registry. Therefor SSH into your dedicated server again.

# list content (optional)
$ ls -la /opt/registry-data/docker/registry/v2/repositories/

Simple Vault introduction

Today a tiny introduction to Vault from HashiCorp. I will just show the simplest usage. But this will help to get a first idea of Vault and the features.

Requirements

Preparation

# download vault (0.8.0)
$ curl -C - -k https://releases.hashicorp.com/vault/0.8.0/vault_0.8.0_darwin_amd64.zip -o ~/Downloads/vault.zip

# unzip and delete archive
$ unzip ~/Downloads/vault.zip && rm ~/Downloads/vault.zip

# move binary to target
$ sudo mv ~/Downloads/vault /usr/local/

Start Vault Server

# start in DEV mode
$ vault server -dev
...
Root Token: 6fdbf7b1-56a2-e665-aa31-0e3b5add5b77
...

Copy Root Token value to clipboard!!!

Insomnia

Create new environment “vault” under “Manage Environments” and store here your URL as “base_url” and Root Token as “api_key”.

insomnia vault environment

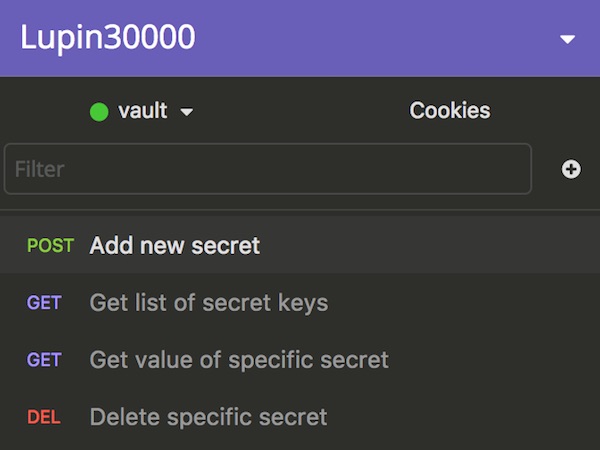
Now we create 4 simple requests

insomnia requests

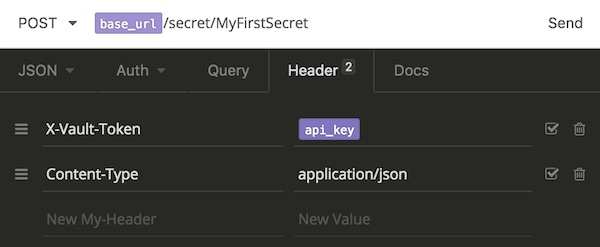
for all requests we add Header

insomnia header

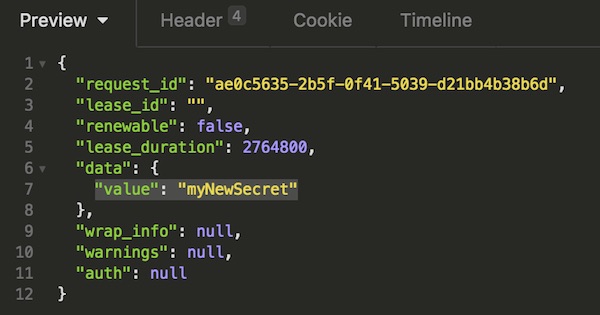
For first URL (POST: Add new secret) we use “{{ base_url }}/secret/MyFirstSecret” and we add following body as JSON.

{
  "value":"myNewSecret"
}

After send the key:value is stored inside Vault. You can modify the request (e.q. “{{ base_url }}/secret/MySecondSecret”) and send some more.

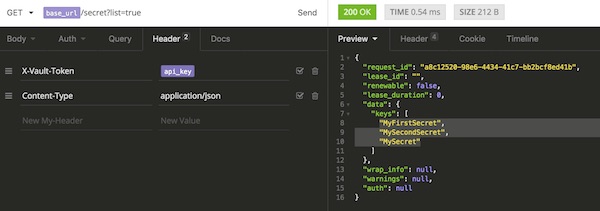
Our next request is to show all keys (GET: Get list of secret keys) “{{ base_url }}/secret?list=true”. The Preview will show similar output.

insomnia get vault keys

3rd request is to get the value from a specific key (GET: Get value of specific secret) “{{ base_url }}/secret/MySecret”.

insomnia get vault value

Last request is for delete (DEL: Delete specific secret) “{{ base_url }}/secret/MySecret”.

Tipp: if you lost the root token (Vault server is running) you can find the value!

# show file content
$ cat ~/.vault-token

Shell linter evaluation and usage

Tomorrow, the 1st of August is a national holiday in Switzerland … So I do one day off and have some time. For a long time I wanted to deal with Shell lint. After some research, i found a few open-source tools. By the way … linters are being written for many programming languages and document formats.

Preparation

For evaluation i will not install the tools on my local system,… so Vagrant (with CentOS 7) is my choice.

# create project
$ mkdir -p ~/Projects/ShellLint && cd ~/Projects/ShellLint

# create example.sh
$ vim example.sh

# create Vagrantfile
$ vim Vagrantfile
#!/bin/bash

declare -r VERSION="1.0.0"
declare -r FILE_NAME=$(basename "$0")

function fc_usage()
{
 printf "Usage: %s" "$FILE_NAME"
 printf " [-h] [-V]\n"
}

function failure()
{
 print "here is a error"

syntax() {
 print "this line has simply to many chars ... with a simple shell lint you should see"
}

function fc_bashism()
{
 echo -e "hello world"
}

function main()
{
 fc_usage
 fc_bashism
}

exit 0
# -*- mode: ruby -*-
# vi: set ft=ruby :

Vagrant.configure("2") do |config|
  config.vm.box = "lupin/centos7"
  config.vm.box_check_update = false
  config.vm.synced_folder '.', '/vagrant', disabled: true

  config.vm.provision "file", source: "example.sh", destination: "example.sh"

  config.vm.provider "virtualbox" do |vb|
    vb.gui = false
    vb.name = "ShellLint"
    vb.memory = "1024"
    vb.cpus = 1
  end

end

Note: I created the Vagrant box “lupin/centos” via Packer … here my GitHub repository.

# create environment
$ vagrant up

# SSH into VM
$ vagrant ssh

Shell option -n

Many shell’s already offer a very simple script analysis. The option -n read commands in script, but do not execute them (syntax check).

# example bash
$ bash -n example.sh

# example shell
$ sh -n example.sh

Okay … but not really what I want… (more details are welcome)

shlint and checkbashisms

I found the repository here.

# install ruby (optional)
$ yum install -y ruby

# install json_pure (optional)
$ gem install json_pure

# install shlint
$ gem install shlint

# create config
$ echo -e 'shlint_shells="bash sh"\nshlint_debug=1' > .shlintrc

# run shlint
$ shlint example.sh

# run checkbashisms
$ checkbashisms -f example.sh

Note: for both tools you should change the shebang to “#!/bin/sh”

For shlint… I don’t get it. For checkbashisms … good if will write portable Shell scripts.

bashate

I found it here on Pypi.

# install epel repository
$ yum install -y epel-release

# install pip (python 2.x)
$ yum install -y python2-pip

# install bashate
$ pip install bashate

# run bashate
$ bashate example.sh

Nice … but not really all Standards.

Shellsheck

Shellcheck is known! Here the online service and here the repository.

# install epel repository
$ yum install -y epel-release

# update (optional)
$ yum update -y

# install ShellCheck
$ yum install -y ShellCheck

# run ShellCheck
$ shellcheck example.sh

I stay with that tool. Currently there are packages for almost every known OS.

Additional

Who knows me … knows that I do not like Installer and prefer Docker use. Here’s some fun.

# exit Vagrant and destroy
$ vagrant halt && vagrant destroy -f

# create Dockerfile
$ vim Dockerfile

# create Applescript
$ vim linter.scpt

# build Docker image
$ docker build -t alpine/shellcheck .

# change permission
$ chmod +x linter.scpt

# run Applescript
$ osascript linter.scpt
FROM alpine:latest

# install needed packages
RUN apk --update add wget

# download archive
RUN wget -q --no-check-certificate https://storage.googleapis.com/shellcheck/shellcheck-latest.linux.x86_64.tar.xz

# unzip archive
RUN tar xvfJ shellcheck-latest.linux.x86_64.tar.xz

# move binary
RUN mv /shellcheck-latest/shellcheck /usr/local/bin/shellcheck

# cleanup
RUN apk del wget
RUN rm -f shellcheck-latest.linux.x86_64.tar.xz
RUN rm -fr shellcheck-latest/

# change to mount directory
WORKDIR /mnt

# set entrypoint
ENTRYPOINT ["/usr/local/bin/shellcheck"]
#!/usr/bin/osascript

-- define global variables
global appName
global imageName

-- set magic values
set appName to "Docker"
set imageName to "alpine/shellcheck "

-- run docker linters
on LintShell(macPath)
	set posixPath to quoted form of POSIX path of macPath
	set fileName to do shell script "basename " & posixPath
	set dirName to do shell script "dirname " & posixPath
	set shellCmd to "docker run --rm -i -v " & dirName & ":/mnt " & imageName & fileName

	tell application "Terminal"
		set shell to do script shellCmd in front window
	end tell
end LintShell

-- display select box
on SelectFile()
	set dlTitle to "Nothing selected..."
	set dlMsg to "Process is terminated."

	try
		set macPath to choose file
	on error
		display dialog dlMsg buttons ["OK"] with title dlTitle
		return dlMsg
	end try

	LintShell(macPath)
end SelectFile

-- start Docker
on StartDocker()
	set dlTitle to "Docker cannot started"
	set dlMsg to "Something went wrong, could not start Docker!"

	try
		tell application appName
			activate
		end tell
	on error
		display dialog dlMsg buttons ["OK"] with title dlTitle
	end try
end StartDocker

-- check if Docker is running
on RunScript()
	set dlTitle to "Docker not running"
	set dlMsg to "Should Docker started?"

	if application appName is running then
		SelectFile()
	else
		display dialog dlMsg buttons ["OK", "No"] with title dlTitle
		if button returned of result is "OK" then
			StartDocker()
		end if
	end if
end RunScript

RunScript()

😉 just for fun…

Docker, Telegraf, InfluxDB and Grafana

I have already presented various tutorials on docker monitoring. This time we will use Telegraf.

Project preparation

# create new project
$ mkdir -p Projects/DTIG/influxdb && cd Projects/DTIG/

# create telegraf.conf
$ touch telegraf.conf

InfluxDB preparation

# start InfluxDB
$ docker run --name influxdb -p 8086:8086 -v $PWD/influxdb:/var/lib/influxdb influxdb

# create new user
$ curl -G http://localhost:8086/query --data-urlencode "q=CREATE USER telegraf WITH PASSWORD 'password123' WITH ALL PRIVILEGES"

# create database for telegraf
$ curl -G http://localhost:8086/query -u telegraf:password123 --data-urlencode "q=CREATE DATABASE telegraf_db"

# show ip of influxdb container
$ docker inspect --format '{{ .NetworkSettings.IPAddress }}' influxdb
...
172.17.0.2
...

Telegraf preparation

# Telegraf Configuration

[agent]
  interval = "10s"
  round_interval = true
  metric_batch_size = 1000
  metric_buffer_limit = 10000
  collection_jitter = "0s"
  flush_interval = "10s"
  flush_jitter = "0s"
  precision = ""
  debug = false
  quiet = false
  logfile = ""
  hostname = ""
  omit_hostname = false

[[outputs.influxdb]]
  urls = ["http://172.17.0.2:8086"] # required
  database = "telegraf_db" # required
  retention_policy = ""
  write_consistency = "any"
  timeout = "5s"

[[inputs.cpu]]
  percpu = true
  totalcpu = true
  collect_cpu_time = false

[[inputs.disk]]
  ignore_fs = ["tmpfs", "devtmpfs", "devfs"]

[[inputs.docker]]
  endpoint = "unix:///var/run/docker.sock"
  container_names = []
  timeout = "5s"
  perdevice = true
  total = false
  # docker_label_include = []
  # docker_label_exclude = []

… Read more about Telegraf on documentation page …

# edit telegraf.conf
$ vim telegraf.conf

# start Telegraf
$ docker run --name telegraf -v $PWD/telegraf.conf:/etc /telegraf/telegraf.conf -v /var/run/docker.sock:/var/run/docker.sock telegraf

Note: The space after /etc is just because of security settings of my provider.

… after short time …

# show measurements (be patient)
$ curl -G http://localhost:8086/query -u telegraf:password123 --data-urlencode "db=telegraf_db" --data-urlencode "q=SHOW MEASUREMENTS"

Grafana preparation

# run grafana container
$ docker run --name grafana -i -p 3000:3000 grafana/grafana

# open Grafana WebUI and login (admin:admin)
$ open -a Safari http://localhost:3000

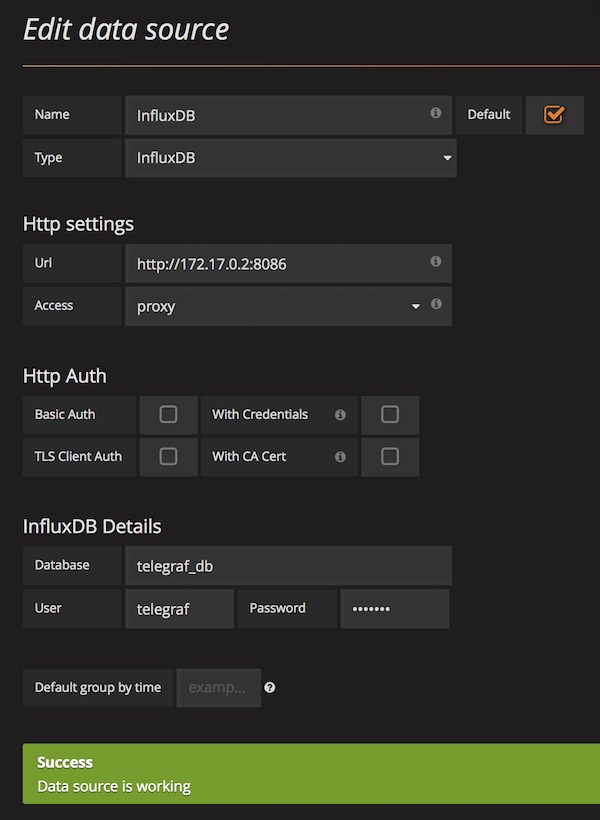
After login (admin:admin) you can add new Data Source.

Grafana InfluxDB Telegraf DataSource

Okay … all done … you can start to create Dashboards or search for existing Dashboards for import.