Firewalld Rich Rules basics

This tutorial will help you to get started with the firewalld configuration. Basics on zones and rich rules are presented.

What we do

The shell provisioner will ensure that on all hosts firewalld and curl are installed. For “host_protected” the provisioner will install nginx for demo purposes, too. Furthermore, the firewall will configured on “host_protected”.

Every host has two interfaces NAT (enp0s3) and host-only (enp0s8). The provisioner will not touch the NAT interface (zone: public) rules! Only the host-only interface (zone: home) rules will modified!

# show result configuration public (local)
$ vagrant ssh host_protected -c 'sudo firewall-cmd --list-all --zone=public'
...
public (active)
  target: default
  icmp-block-inversion: no
  interfaces: enp0s3
  sources:
  services: dhcpv6-client ssh
  ports:
  protocols:
  masquerade: no
  forward-ports:
  sourceports:
  icmp-blocks:
  rich rules:

# show result configuration home (local)
$ vagrant ssh host_protected -c 'sudo firewall-cmd --list-all --zone=home'
...
home (active)
  target: default
  icmp-block-inversion: no
  interfaces: enp0s8
  sources:
  services:
  ports:
  protocols:
  masquerade: no
  forward-ports:
  sourceports:
  icmp-blocks:
  rich rules:
    rule family="ipv4" source address="192.168.33.10" service name="http" accept
    rule family="ipv4" source address="192.168.33.20" service name="ssh" accept

Project

Here are all needed files…

---
- name: host_http_access
  ip: 192.168.33.10
  hostname: http.local
- name: host_ssh_access
  ip: 192.168.33.20
  hostname: ssh.local
- name: host_protected
  ip: 192.168.33.30
  hostname: protected.local

Please add your values for box name/url!

# -*- mode: ruby -*-
# vi: set ft=ruby :

require 'yaml'

Vagrant.require_version ">= 1.9.3"
machines = YAML.load_file('hosts.yml')

Vagrant.configure("2") do |config|

  machines.each do |machines|

    config.vm.define machines["name"] do |machine|

      # disable ssh key update
      machine.ssh.insert_key = false

      # vagrant box name
      machine.vm.box = ""

      # vagrant box url
      machine.vm.box_url = ""

      # disable box update
      machine.vm.box_check_update = false

      # set hostname
      machine.vm.hostname = machines["hostname"]

      # disable synced_folder
      machine.vm.synced_folder ".", "/vagrant", disabled: true

      # 2nd network interface (private)
      machine.vm.network "private_network", ip: machines["ip"]

      # virtualbox settings
      machine.vm.provider :virtualbox do |vb|
        vb.name = machines["name"]
        vb.cpus = 1
        vb.memory = '1024'
        vb.gui = false
      end

      # run shell provisioner
      if machines["name"] == 'host_protected'
        machine.vm.provision "shell", path: "provisioner.sh", :args => "protected"
      else
        machine.vm.provision "shell", path: "provisioner.sh"
      end

    end

  end

end
#! /usr/bin/env bash

# install firewalld and curl
sudo yum install -y firewalld curl

# enable firewalld
sudo systemctl enable firewalld

# start firewalld
sudo systemctl start firewalld

# configure firewalld rich rules
if [ "${1}" == "protected" ]; then
  # install epel-release
  sudo yum install -y epel-release

  # install nginx
  sudo yum install -y nginx

  # enable nginx
  sudo systemctl enable nginx

  # start nginx
  sudo systemctl start nginx

  # change enp0s8 to home zone
  sudo firewall-cmd --zone=home --change-interface=enp0s8 --permanent

  # restart firewalld service
  sudo systemctl restart firewalld

  # remove all services form zone home
  sudo firewall-cmd --zone=home --remove-service dhcpv6-client --permanent
  sudo firewall-cmd --zone=home --remove-service mdns --permanent
  sudo firewall-cmd --zone=home --remove-service samba-client --permanent
  sudo firewall-cmd --zone=home --remove-service ssh --permanent

  # add rich rules
  sudo firewall-cmd --zone=home --add-rich-rule='rule family="ipv4" service name="http" source address="192.168.33.10" accept' --permanent
  sudo firewall-cmd --zone=home --add-rich-rule='rule family="ipv4" service name="ssh" source address="192.168.33.20" accept' --permanent

  # reload firewall
  sudo firewall-cmd --reload
fi

Usage

# start vagrant environment (local)
$ vagrant up

# show status (optional - local)
$ vagrant status
...
Current machine states:

host_http_access          running (virtualbox)
host_ssh_access           running (virtualbox)
host_protected            running (virtualbox)

# ssh into host_http_access (local)
$ vagrant ssh host_http_access

# try http via curl (host_http_access)
$ curl -I http://192.168.33.30

# try ssh (host_http_access)
$ ssh vagrant@192.168.33.30

# ssh into host_ssh_access (local)
$ vagrant ssh host_ssh_access

# try http via curl (host_ssh_access)
$ curl -I http://192.168.33.30

# try ssh (host_ssh_access)
$ ssh vagrant@192.168.33.30

# destroy vagrant environment
$ vagrant destroy -f

Note: before you destroy the vagrant environment, have a look on zones xml files for “host_protected”!

# ssh into host_protected (local)
$ vagrant ssh host_protected

# change to root (host_protected)
$ sudo su -

# change directory
$ cd /etc

# cat actual zone xml files
$ cat firewalld/zones/*.xml
Test your infrastructure

Infrastructures can be very big. Luckily, there are provisioner like Chef, Salt, Ansible and etc. These provisioners can be very complex and possibly the developer has done something wrong. Therefore the infrastructure has to be tested! Tools like goss, Serverspec and Testinfra helps testers to validate. This tutorial show the first steps with Testinfra.

Testinfra is written in Python very small and easy to understand. Here is the GitHub repository.

Precondition

  • Vagrant (min. 1.9.3) installed
  • Python (min. 2.7) installed
  • pip (min. 9.0.1) and virtualenv (min. 15.1.0) installed
  • make (min. 3.81) installed

Project structure

To get used to it – i prepared some files for you. You only need to change the box name/url in Vagrantfile.

$ tree
.
├── Makefile
├── requirements.txt
├── Vagrantfile
└── tests.py
ENV_DIR = .env
CURRENT_DIR := $(shell pwd)
INTERPRETER = $(CURRENT_DIR)/$(ENV_DIR)/bin/
PATH := ${PATH}:$(INTERPRETER)

help:
	@echo "run make <target> with:"
	@echo " > env       : create virtualenv directory $(ENV_DIR)"
	@echo " > deps      : install dependencies from requirements.txt"
	@echo " > clean_env : delete virtualenv directory $(ENV_DIR)"
	@echo " > up        : run vagrant up"
	@echo " > destroy   : run vagrant destroy"
	@echo " > test      : run testinfra on vagrant environment"
	@echo " > clean_all : delete all files and directories"

env:
	@echo "[RUN]: create virtualenv"
	virtualenv $(ENV_DIR) && \
	. $(ENV_DIR)/bin/activate && \
	make deps

deps:
	@echo "[RUN]: install dependencies"
	$(INTERPRETER)/pip install -r requirements.txt

up:
	@echo "[RUN]: vagrant up"
	vagrant up

destroy:
	@echo "[RUN]: vagrant destroy -f"
	vagrant destroy -f
	rm -fr $(CURRENT_DIR)/.vagrant

test:
	@echo "[RUN]: run testinfr on vagrant environment"
	vagrant ssh-config > $(CURRENT_DIR)/ssh-config
	$(INTERPRETER)/pytest -v --hosts=default --ssh-config=$(CURRENT_DIR)/ssh-config tests.py

clean_all:
	@echo "[RUN]: delete all files and directories"
	rm -fr $(CURRENT_DIR)/.cache $(CURRENT_DIR)/__pycache__
	rm -f $(CURRENT_DIR)/ssh-config
	make destroy
	make clean_env

clean_env:
	@echo "[RUN]: delete virtualenv"
	rm -fr $(ENV_DIR)
testinfra==1.5.4
paramiko==2.1.2
#!/usr/bin/env python

def test_system_type(SystemInfo):
    '''Check OS type'''
    type = SystemInfo.type
    assert type == 'linux'

def test_user_exists(User):
    '''Check user exists'''
    user = User('vagrant')
    assert user.exists

def test_firewalld_is_installed(Package):
    '''Check firewalld is installed'''
    package = Package('firewalld')
    assert package.is_installed

def test_firewalld_running_and_enabled(Service):
    '''Check firewalld service is running and enabled'''
    service = Service('firewalld')
    assert service.is_running
    assert service.is_enabled
# -*- mode: ruby -*-
# vi: set ft=ruby :

Vagrant.configure("2") do |config|

  # disable ssh key update
  config.ssh.insert_key = false

  # vagrant box name
  config.vm.box = ""

  # vagrant box url
  config.vm.box_url = ""

  # disable box update
  config.vm.box_check_update = false

  # disable synced_folder
  config.vm.synced_folder ".", "/vagrant", disabled: true

  # 2nd network interface (public)
  # config.vm.network "public_network"

  # virtualbox settings
  config.vm.provider "virtualbox" do |vb|
    vb.name = "example_vm"
    vb.cpus = "2"
    vb.memory = "2048"
    vb.gui = false
  end

end

Usage

# create virtualenv and install dependencies
$ make env

# create vagrant environment
$ make up

# run tests
$ make test

# delete all generated files and directories
$ make clean_all

Testinfra offers several connections backends for remote command execution and can be used with python standard unit test framework: unittest. So the integration with build servers is easily possible.

Kickstart Configurator

With kickstart configurator you don`t need to remember the correct syntax of kickstart files. An graphical user interface helps to create or to edit kickstart files on the fly.

Preparation

# install KDE
$ yum groupinstall -y "KDE Plasma Workspaces"

# install kickstart configurator
$ yum install -y system-config-kickstart

# start KDE
$ startx

Note: Of course you can also use Gnome, Cinnamon, MATE or Xfce!

Usage

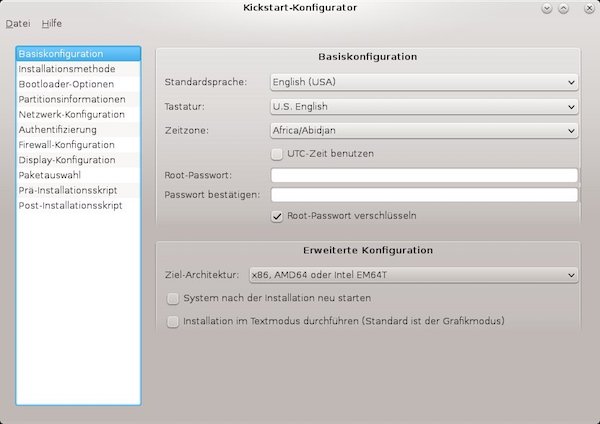
To start the kickstart configurator search the application “Kickstart” [Applications => System Tools => Kickstart] or run terminal command:

# start kickstart configurator
$ system-config-kickstart
Kickstart-Konfigurator

Note: Via [File => Preview] you can review your current selections before saving.

Validation

After the creation, you should check the kickstart file!

# install pykickstart
$ yum install -y pykickstart

# start validate a kickstart file
$ ksvalidator </path/to/kickstart file>

TCP port scanner Brutescan

Brutescan is a fast and noisy TCP port scanner written in go.

Preparation

# install git and curl packages
$ sudo apt install -y curl git

# download go (do not install from Debian)
$ curl -O https://storage.googleapis.com/golang/go1.8.linux-amd64.tar.gz

# unzip archive
$ tar xvf go1.8.linux-amd64.tar.gz

# set owner and group (recursive)
$ sudo chown -R root:root go

# move all into target directory
$ sudo mv go /usr/local/

Configure go (for user)

# create hidden go directory
$ mkdir ~/.go

# configure needed paths (inside .bashrc)
$ echo "GOPATH=$HOME/.go" >> ~/.bashrc
$ echo "export GOPATH" >> ~/.bashrc
$ echo "PATH=\$PATH:/usr/local/go/bin:\$GOPATH/bin" >> ~/.bashrc

# reload
$ source ~/.bashrc

# check go version
$ go version
go version go1.8 linux/amd64

Install brutescan

# install packages from github
$ go get github.com/asciimoo/brutescan

# show bombardier help
$ brutescan --help

Usage/Examples

# scan all ports on localhost
$ brutescan localhost
...
Scanning localhost (127.0.0.1)
Port range: 1-65535 (65534 ports)
Concurrent connections: 65512

port 22    open
port 25    open
port 111   open
port 42619 open

Scan finished in 2.970551852s
...

# scan port range with specific concurrent pool size
$ brutescan -pmin 22 -pmax 2000 -pool 100 heise.de
...
Scanning heise.de (193.99.144.80)
Port range: 22-2000 (1978 ports)
Concurrent connections: 100

no open ports found

Scan finished in 1m0.087341111s ...

HTTP benchmarking with Bombardier

Bombardier is a nice HTTP(S) benchmarking tool, written in Go language, for software performance testers.

Preparation

# install git and curl packages
$ sudo apt install -y curl git

# download go (do not install from Debian)
$ curl -O https://storage.googleapis.com/golang/go1.8.linux-amd64.tar.gz

# unzip archive
$ tar xvf go1.8.linux-amd64.tar.gz

# set owner and group (recursive)
$ sudo chown -R root:root go

# move all into target directory
$ sudo mv go /usr/local/

Configure go (for user)

# create hidden go directory
$ mkdir ~/.go

# configure needed paths (inside .bashrc)
$ echo "GOPATH=$HOME/.go" >> ~/.bashrc
$ echo "export GOPATH" >> ~/.bashrc
$ echo "PATH=\$PATH:/usr/local/go/bin:\$GOPATH/bin" >> ~/.bashrc

# reload
$ source ~/.bashrc

# check go version
$ go version
go version go1.8 linux/amd64

Install bombardier

# install packages from github
$ go get -u github.com/codesenberg/bombardier

# show bombardier help
$ bombardier --help

Usage/Examples

# run with 5 connections on 10 sec.
$ bombardier -c 5 -k https://www.heise.de
...
Statistics        Avg      Stdev        Max
  Reqs/sec        32.44      37.83        201
  Latency      152.35ms    72.93ms      1.24s
  HTTP codes:
    1xx - 0, 2xx - 329, 3xx - 0, 4xx - 0, 5xx - 0
    others - 0
  Throughput:     6.18MB/s
...

# run with 10 connections on 5 sec and show latency statistics.
$ bombardier -d 5s -c 10 -l -k https://www.heise.de
...
Statistics        Avg      Stdev        Max
  Reqs/sec        56.51      59.10        251
  Latency      173.10ms   102.95ms      1.32s
  Latency Distribution
     50%   155.83ms
     75%   164.06ms
     90%   174.99ms
     99%   542.91ms
  HTTP codes:
    1xx - 0, 2xx - 294, 3xx - 0, 4xx - 0, 5xx - 0
    others - 0
  Throughput:    10.63MB/s
...


HTTP inspection with Wuzz

Wuzz is a very easy command line tool for HTTP(S) inspection with very much potential. In this tutorial I will show the installation on Debian 8.7 (jessie).

Preparation

# install git and curl packages
$ sudo apt install -y curl git

# download go (do not install from Debian)
$ curl -O https://storage.googleapis.com/golang/go1.8.linux-amd64.tar.gz

# unzip archive
$ tar xvf go1.8.linux-amd64.tar.gz

# set owner and group (recursive)
$ sudo chown -R root:root go

# move all into target directory
$ sudo mv go /usr/local/

Configure go (for user)

# create hidden go directory
$ mkdir ~/.go

# configure needed paths (inside .bashrc)
$ echo "GOPATH=$HOME/.go" >> ~/.bashrc
$ echo "export GOPATH" >> ~/.bashrc
$ echo "PATH=\$PATH:/usr/local/go/bin:\$GOPATH/bin" >> ~/.bashrc

# reload
$ source ~/.bashrc

# check go version
$ go version
go version go1.8 linux/amd64

Install wuzz

# install packages from github
$ go get github.com/asciimoo/wuzz

# check wuzz version
$ wuzz --version wuzz 0.2.0

# show wuzz help
$ wuzz --help

# simple run
$ wuzz

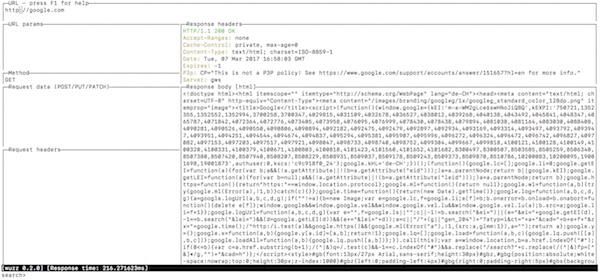
If everything is going well, the terminal should look like this and you can start.

example wuzz cli

Vagrant tipps and tricks

This time a few things which make life easier.

Check for Windows

There a quit some situations for Vagrant where you have platform specific steps to do. Here an example for Windows.

# -*- mode: ruby -*-
# vi: set ft=ruby :

Vagrant.configure("2") do |config|
  # some content

  if Vagrant::Util::Platform.windows? then
    # do something Windows specific
  else
    # do something not Windows specific
  end
end

Set a default provider

By default, VirtualBox is the default provider for Vagrant but sometimes it is needed to change.

# set provider via vagrant up command
$ vagrant up --provider vmware_fusion

It is possible to use environment variables in Vagrantfile. So the 2nd option is to set provider inside Vagrantfile!

# -*- mode: ruby -*-
# vi: set ft=ruby :

ENV['VAGRANT_DEFAULT_PROVIDER'] = 'vmware_fusion'

Vagrant.configure("2") do |config|
  # some content
end

Multiple Vagrantfiles in one directory

Sometimes it could happen that you have multiple Vagrantfiles in one directory. In such case environment variables helps.

# select specific Vagrantfile
$ VAGRANT_VAGRANTFILE=Vagrantfile_01 vagrant up

Create log files

To enable detailed logging use the VAGRANT_LOG environmental variable.

# run with info log level (Linux and Mac OS)
$ VAGRANT_LOG=info vagrant up

# run with info log level (Windows)
$ set VAGRANT_LOG=info
$ vagrant up

Level names can be “debug”, “info”, “warn” and “error”.

Jenkins log without colored output

For Jenkins log, the color output is superfluous! Here an simple example:

pipeline {
  agent any

  stages {
    stage('Build') {
      steps {
        // Make the output without color
        vagrant up --no-color
      }
    }
  }
}

Tiny SSH audit

I wrote an bash script which makes the SSH server configuration audit a little bit easier. Here now an description for usage. The repository can found here.

Usage

# upload script to target host (tmp directory)
$ scp ssh_audit.sh <user>@<host>:/tmp

# login into target host
$ ssh <user>@<host>

# switch to root
$ su -

# change file permissions (optional)
$ chmod u+x /tmp/ssh_audit.sh

# run ssh audit
$ /tmp/ssh_audit.sh

The output is self-explanatory. If you need more details, just run following command.

# output the effective configuration to stdout (Extended test mode)
$ sshd -T