Add remote CentOS to docker-machine

This tutorial shows how to add a remote CentOS to your local docker-machine.

Conditions

Preparation

The first step is to install docker on CentOS 7.

# update packages
$ yum update

# change into repository directory
$ cd /etc /yum.repos.d/

# add the docker repo
$ tee docker.repo <<-'EOF'
[dockerrepo]
name=Docker Repository
baseurl=https://yum.dockerproject.org/repo/main/centos/$releasever/
enabled=1
gpgcheck=1
gpgkey=https://yum.dockerproject.org/gpg
EOF

# install docker
$ yum install docker-engine

# start docker
$ service docker start

# check version
$ docker --version && docker images

Second step is to setup firewall rules on CentOS 7.

# change firewalld
$ firewall-cmd --permanent --zone=public --add-port=2376/tcp
$ firewall-cmd --reload

# check rules
$ firewall-cmd --list-all

The last step on CentOS 7 is to share ssh public key.

# create ssh key (local)
$ ssh-keygen -t rsa -b 4096

Add CentOS 7 server to docker-machine

# list docker-machines
$ docker-machine ls

# add remote to local docker-machine
$ docker-machine create -d generic --generic-ip-address <IP | Domain> --generic-ssh-key ~/.ssh/id_rsa --generic-ssh-user <user> myServer

# pointing shell
$ eval $(docker-machine env myServer)

# list docker-machines
$ docker-machine ls
...
NAME        ACTIVE   DRIVER       STATE     URL                SWARM   DOCKER    ERRORS
myServer      *      generic      Running   tcp://<ip>:2376    v1.11.1

Vagrant Plugin Recommendations

Today a few Vagrant Plugin Recommendations.

Preconditions

Preparation

Create a simple Vagrant BaseBox (as here) and if you like use the following Vagrantfile.

# -*- mode: ruby -*-
# vi: set ft=ruby :

Vagrant.configure(2) do |config|
  config.vm.box = "lupin/centos7"
  # config.vm.network "public_network"
  config.vm.synced_folder ".", "/vagrant", disabled: true
  # config.vm.synced_folder "./shared", "/vagrant"

  config.vm.provider "virtualbox" do |vb|
    vb.cpus = "2"
    vb.memory = "2048"
  end

  if Vagrant.has_plugin?("vagrant-hostsupdater")
    config.vm.network :private_network, ip: "10.0.0.10"
    config.hostsupdater.aliases = ["example.test"]
  end

  config.vm.provision "shell", inline: <<-SHELL
    sudo yum update -y
    sudo yum install -y vim docker
    sudo yum clean all
    sudo systemctl enable docker
    sudo systemctl start docker
    sudo setenforce 0
  SHELL

  config.vm.provision "docker" do |d|
    d.run "nginx", args: "-p 8080:80"
  end

  config.vm.provision "shell", inline: "sudo hostname -I"
end

1. vagrant-camera

# install camera plugin
$ vagrant plugin install vagrant-camera

# start VM via Vagrant
$ vagrant up

# do screenshot on current target folder
$ vagrant camera -s .

# show all pictures (Mac OS X)
$ open screenshot_default_*.png

2. vagrant-vbguest

# start VM via Vagrant
$ vagrant up

# ssh into VM (optional)
$ vagrant ssh

# check current version (optional)
$ VBoxControl --version
...
5.0.20r106931

# exit from VM (optional)
$ exit

# install vbguest plugin
$ vagrant plugin install vagrant-vbguest

# reload VM
$ vagrant reload

# ssh into VM (optional)
$ vagrant ssh

# list all downloaded (optional)
$ ls -l /opt
...
VBoxGuestAdditions-5.0.14
VBoxGuestAdditions-5.0.20

3. vagrant-hostsupdater

# install hostsupdater plugin
$ vagrant plugin install vagrant-hostsupdater

# check content of local hosts (optional)
$ cd /etc && cat hosts

# start VM
$ vagrant up

# or reload if already running
$ vagrant reload --provision

# check content of local hosts (optional)
$ cd /etc && cat hosts

# check status
$ vagrant ssh -c 'curl -v example.test:8080'

# stop VM
$ vagrant halt

# check content of local hosts (optional)
$ cd /etc && cat hosts


Python, Selenium Grid and Docker

With Docker you can quickly and easily install, configure and use Selenium Grid. This tutorial shows the respective steps that you need as a software tester (or Developer). Instead of Python you can also use other languages, which are supported by Selenium​.

Preconditions

Preparation of files

# create new project
$ mkdir -p ~/Project/SeleniumTutorial && cd ~/Project/SeleniumTutorial

# create docker-compose.yml (version 1)
$ vim v1-docker-compose.yml

# or create docker-compose.yml (version 2)
$ vim v2-docker-compose.yml

# create python example.py
$ vim example.py

Note: You can opt for a version of docker-compose.yml!

Version: 1

---
selenium_hub:
  image: selenium/hub
  ports:
    - 4444:4444
node_1:
  image: selenium/node-chrome
  links:
    - selenium_hub:hub
node_2:
  image: selenium/node-firefox
  links:
    - selenium_hub:hub

Version: 2

---
version: '2'
services:
  selenium_hub:
    image: selenium/hub
    ports:
      - 4444:4444
  node_1:
    image: selenium/node-chrome
    depends_on:
      - selenium_hub
    environment:
      - HUB_PORT_4444_TCP_ADDR=selenium_hub
  node_2:
    image: selenium/node-firefox
    environment:
      - HUB_PORT_4444_TCP_ADDR=selenium_hub
    depends_on:
      - selenium_hub
import os
import datetime
import time
import unittest
from selenium import webdriver


class Example(unittest.TestCase):

    def setUp(self):

        self.driver = webdriver.Remote(
            command_executor='http://192.168.99.100:4444/wd/hub',
            desired_capabilities={
                'browserName': 'firefox',
                'javascriptEnabled': True
            }
        )

        self.driver.get('http://softwaretester.info/')

    def test_something(self):

        dt_format = '%Y%m%d_%H%M%S'
        cdt = datetime.datetime.fromtimestamp(time.time()).strftime(dt_format)
        current_location = os.getcwd()
        img_folder = current_location + '/images/'

        if not os.path.exists(img_folder):
            os.mkdir(img_folder)

        picture = img_folder + cdt + '.png'
        self.driver.save_screenshot(picture)

    def tearDown(self):

        self.driver.quit()


if __name__ == "__main__":

    unittest.main(verbosity=1)

Create environment

# create new VM
$ docker-machine create -d virtualbox Grid

# pointing shell
$ eval $(docker-machine env Grid)

# show status (optional)
$ docker-machine ls
...
NAME   ACTIVE   DRIVER       STATE     URL                         SWARM   DOCKER    ERRORS
Grid   *        virtualbox   Running   tcp://192.168.99.100:2376           v1.11.1 

# run docker-compose (Version: 1)
$ docker-compose -f v1-docker-compose.yml up -d

# run docker-compose (Version: 2)
$ docker-compose -f v2-docker-compose.yml up -d

# show status (Version: 1)
$ docker-compose -f v1-docker-compose.yml ps
...
             Name                         Command           State           Ports          
------------------------------------------------------------------------------------------
seleniumtutorial_node_1_1         /opt/bin/entry_point.sh   Up                           
seleniumtutorial_node_2_1         /opt/bin/entry_point.sh   Up                           
seleniumtutorial_selenium_hub_1   /opt/bin/entry_point.sh   Up      0.0.0.0:4444->4444/tcp

# show status (Version: 2)
$ docker-compose -f v2-docker-compose.yml ps
...
             Name                         Command           State           Ports          
------------------------------------------------------------------------------------------
seleniumtutorial_node_1_1         /opt/bin/entry_point.sh   Up                           
seleniumtutorial_node_2_1         /opt/bin/entry_point.sh   Up                           
seleniumtutorial_selenium_hub_1   /opt/bin/entry_point.sh   Up      0.0.0.0:4444->4444/tcp

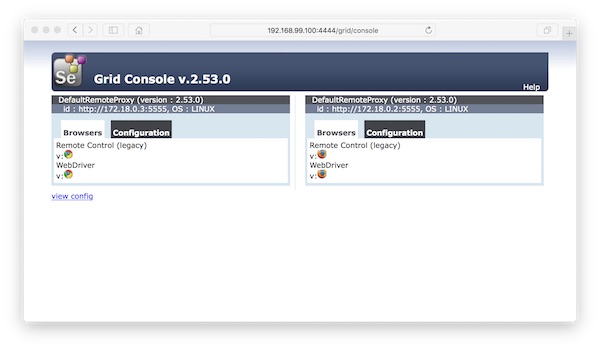
Open Browser

Selenium Grid Console

Run Python script

# run python selenium script
$ python -B ~/Projects/Selenium/example.py

Note: Via browserName (example.py) you can choose the respective browser (firefox or chrome)!

Note: Via docker-compose scale you can add/remove node instances!

# create 2 instances (Version: 1)
$ docker-compose -f v1-docker-compose.yml scale node_1=2

# create 3 instances (Version: 2)
$ docker-compose -f v2-docker-compose.yml scale node_2=3