Jenkins and Sitespeed.io

While surfing the internet I stumbled across Sitespeed.io. It’s a amazing collection of Open Source Tools, which make performance measuring for developers and testers super easy. I tried it out and was immediately impressed. Here’s a little tutorial on how to use Jenkins and Sitespeed.

Requirements

Docker (latest)

Environment setup

With minimal 2 commands the environment (via Docker) is already created. Most of the time will be needed for the plugins installation.

# create Project
$ mkdir -p ~/Projects/Sitespeed/target && cd ~/Projects/Sitespeed

# pull latest sitespeed image (optional)
$ docker pull sitespeedio/sitespeed.io:latest

# start Jenkins container
$ docker run -e JAVA_OPTS="-Dhudson.model.DirectoryBrowserSupport.CSP=\"sandbox allow-scripts; style-src 'unsafe-inline' *;script-src 'unsafe-inline' *;\"" --name jenkins -v $(pwd)/target:/var/jenkins_home -v /var/run/docker.sock:/var/run/docker.sock -v $(which docker):$(which docker) -p 8080:8080 -p 9000:9000 jenkins/jenkins:lts

# open Jenkins in browser (be patient)
$ open http://localhost:8080

On setup wizard finish: unlock Jenkins, install the suggested plugins, create an account and finish the instance configuration.

Jenkins permissions to /var/run/docker.sock

Before you start with Jenkins job configuration, ensure that user jenkins has permissions to /var/run/docker.sock.

# test permissions
$ docker exec -ti jenkins docker info Got permission denied...

# create group docker
$ docker exec -ti -u 0 jenkins groupadd -for -g 0 docker

# add jenkins to group
$ docker exec -ti -u 0 jenkins usermod -aG docker jenkins

# restart jenkins container
$ docker restart jenkins

Jenkins job configuration

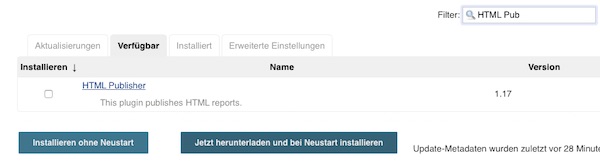
When Jenkins is ready (restarted), install the HTML Publisher PlugIn (no restart after installation of plugin required).

Jenkins HTML Publisher Plugin

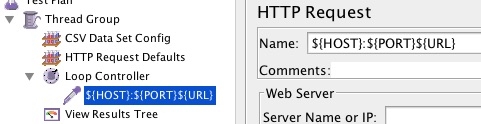
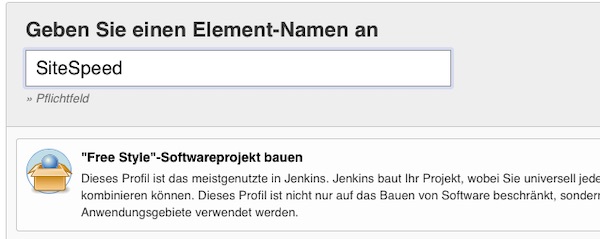
Create a new free-style project named SiteSpeed.

Jenkins SiteSpeed Project

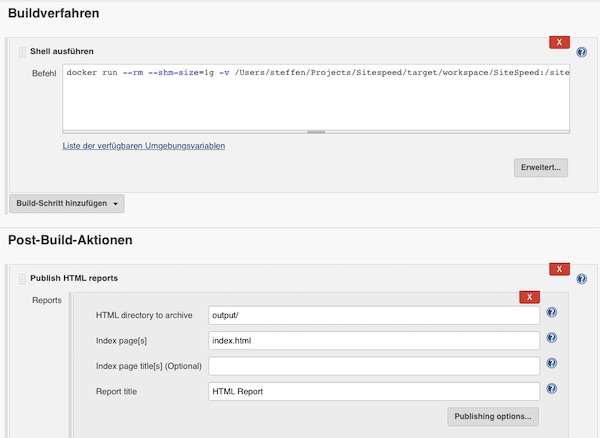
Attention: You need to specify later the absolute path to the local directory /target/workspace/SiteSpeed. If you do not know how, press save and start the build without any job information (empty job configuration) and follow the optional instructions.

# change directory (optional)
$ cd ~/Projects/Sitespeed/target/workspace/SiteSpeed

# get absolute path (optional)
$ pwd

In my case the path is: “/Users/steffen/Projects/Sitespeed/target/workspace/SiteSpeed”. Under job configuration section “Build” enable “Execute shell” and paste following command.

docker run --rm --shm-size=1g -v /Users/steffen/Projects/Sitespeed/target/workspace/SiteSpeed:/sitespeed.io sitespeedio/sitespeed.io --visualMetrics --video --outputFolder output https://www.sitespeed.io/ -n 1

Via Post-Build-Action: Publish HTML reports you can enter the report very simple from the job project page.

Jenkins SiteSpeed Job Configuration

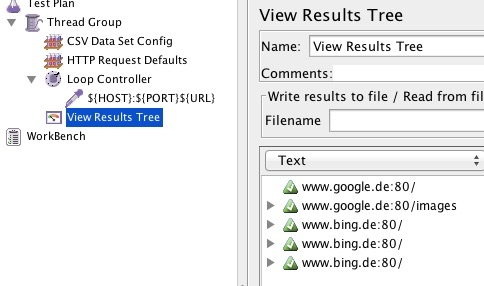
Save everything and run the job. After a short time you can look at the HTML report. See “Pages” > “https://www.sitespeed.io/” for screenshots, HAR and video files. On the website of sitespeed.io is a very detailed documentation and many more examples. Have fun!

REST testing with jMeter

Testing RESTful application is very simple with jMeter. In the first part of the tutorial in this series, the basics are shown. As requests can be created and evaluated. The request going to http://httpbin.org.

Preconditions

  • JAVA is installed
  • jMeter is installed

Steps

Create new “Thread-Group” on “Test Plan” (Add – Threads (User) – Thread Group)

jmeter thread group

Now add one “HTTP Request” inside the “Thread Group” (Add – Sampler – HTTP Request)

jmeter http request

Inside the “HTTP Request” we add now a “HTTP Header Manager” (Add – Config Element – HTTP Header Manager). For configuring we add the Name/Value – “Content-Type”/”application/json”.

jmeter http header manager

At the end we add the “View Results Tree” on “Thread Group” (Add – Listener – View Results Tree)

jmeter view results tree

Our first request example will be a “GET”. On HTTP Request we add following values.

  • Server Name or IP: httpbin.org
  • Method: GET
  • Path: /ip
  • Implementation: HttpClient4
  • Follow Redirects: yes
  • Use KeepAlive: yes
jmeter get request

After save we can start the first run. How to see result will show later. Now second request with POST example. For this we modify the HTTP Request with following values.

  • Method: POST
  • Path: /post
  • Send Parameters With the Request: {“firstName”:”harry”;”lastName”:”Hirsch”}
  • Include Equals?: yes
jmeter post request

Now save and run again. On View Results Tree we can check the results for every http request (Sampler results, Request, Response data).

jmeter rest results

For the JSON response, switching from Text to JSON view. The same way can used for PUT, DELETE or other requests.

Dynamic data for JMeter

Preparation

JAVA and JMeter are already installed.

Steps

Create new “Test Plan” and add one “Thread Group” (Threads (Users)).

  • Number of Threads: 1
  • Ramp-Up Period: 1
  • Loop Count Forever: checked
meter thread group

Add to the “Thread Group” one “CSV Data Set Config” (Config Element).

  • Filename: Path to your CSV file
  • Variable Names: LOOP,HOST,PORT,URL
  • Delimiter: ,
  • Allow quoted data: true
  • Recycle on EOF: false
  • Stop thread on EOF: true
jmeter csv data set config

Add to the “Thread Group” one “HTTP Request Defaults” (Config Element).

  • Server Name or IP: ${HOST}
  • Port Number: ${PORT}
jmeter http request defaults

Add to the “Thread Group” one “Loop Controller” (Logic Controller).

  • Loop Count: ${LOOP}
  • Forever: not checked
jmeter loop controller

Add to the “Loop Controller” one “HTTP Request” (Sampler).

  • Method: GET
  • Path: ${URL}
  • Follow Redirects: checked
  • Use KeepAlive: checked
jmeter http request

Add to the “Thread Group” one “View Results Tree” (Listener).

meter view result tree

Rename the “HTTP Request” into “${HOST}:${PORT}${URL}”.

jmeter http request extension

Create the CSV file with some comma separated values (LOOP,HOST,PORT,URL).

jmeter csv

Run

Save the test plan as JMX file and run the test plan.

jmeter result