Install RfCat on Kali Linux (2020.4)

I finally received my Yard Stick One (Yet Another Radio Dongle) and can get started with it. It is available from Hak5 (incl. ANT500 antenna) and various other resellers. In this tutorial I would like to show you, how to install RfCat on Kali Linux (version 2020.4) and point out the necessary steps, so that you can start pentesting immediately with this awesome device.

Install needed packages

The installation is actually very simple. Python3 is not a problem, even if many sources claim different. The following steps show the installation of the necessary packages (before RfCat can be installed and used). You may have already installed some of them on your system (depends on Kali Metapackages installed).

On my system following packages are installed already: curl, git, make, libusb-1.0-0, python3-numpy, python3-serial, python3-future and ipython3.

# update packages
$ sudo apt update -y

# install packages via apt
$ sudo apt install -y python3-pip python3-usb 

# show python3 packages (optional)
$ pip3 freeze

# install needed python3 packages
$ sudo pip3 install PySide2 pyreadline

The RfCat website explicitly indicates the version of SDCC (max. 3.5.0), so you can decide now to follow this request or take latest by apt.

# show package info
$ apt info sdcc

# install via apt
$ sudo apt install -y sdcc

# verify version (optional)
$ sdcc --version

If you will not use the Kali apt repository. You can find all needed packages for “Debian stretch” here (SDCC & SDCC-Libraries).

# download sdcc-libraries package (version 3.5.0)
$ curl -l -C- http://ftp.de.debian.org/debian/pool/main/s/sdcc/sdcc-libraries_3.5.0+dfsg-2_all.deb -o sdcc-libraries_3.5.0+dfsg-2_all.deb

# download sdcc package (version 3.5.0)
$ curl -l -C- http://ftp.de.debian.org/debian/pool/main/s/sdcc/sdcc_3.5.0+dfsg-2+b1_amd64.deb -o sdcc_3.5.0+dfsg-2+b1_amd64.deb

# install sdcc-libraries
$ sudo dpkg -i sdcc-libraries_3.5.0+dfsg-2_all.deb

# install sdcc package
$ sudo dpkg -i sdcc_3.5.0+dfsg-2+b1_amd64.deb

# show version (optional)
$ sdcc --version

Also for RfCat we don’t use the Kali apt repository but clone the GitHub repository from https://github.com/atlas0fd00m/rfcat (and install it from there).

# clone repository
$ git clone https://github.com/atlas0fd00m/rfcat.git

# change into cloned directory
$ cd rfcat/

# install rfcat
$ sudo python3 setup.py install

Note: Because of security settings (of my provider), I need to show the next command as picture.

copy Yard Stick One rules
# refresh rules
$ sudo udevadm control --reload-rules

Test the installation

That was actually super easy and also happened very quickly. A little test (show help) and then you can start using Yard Stick One.

# change back to home directory
$ cd ~

# show rfcat help (optional)
$ rfcat -h

If you do not get help or an error message, please verify that all dependencies are installed or that you did not mix up different Python versions.

You may need to install the following packages: python3-pyside2.qtcore, python3-pyside2.qtgui and python3-pyside2.qtwidgets.

Run RfCat

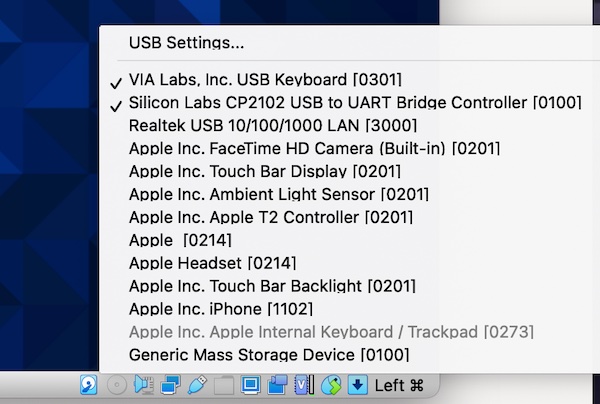
I do run Kali Linux as VirtualBox (6.1) VM, so it’s time to plugin and passthrough the USB device.

Yard Stick One - VirtualBox

Note: I don’t like Passwordless Sudo, but you’re welcome to customize it, to suit your needs.

# verify USB device (optional)
$ lsusb
...
Bus 002 Device 003: ID 1d50:605b OpenMoko, Inc. RfCat YARD Stick One
...

# start rfcat (interactive + d.* objects)
$ sudo rfcat -r

The following commands should help you to get familiar with the Yard Stick One device, as I want just to show the setup in this tutorial and will end here with these examples.

# show help (optional)
In [1]: help(d.setRFRegister)

# show current settings (optional)
In [2]: print(d.reprRadioConfig())

# start listen (ENTER stops)
In [3]: d.RFlisten()

# reset after scan/transmit (important)
In [4]: d.setModeIDLE()

# exit rfcat
In [5]: exit
O.MG Cable Setup on (Kali) Linux

MG made something really cool (and dangerous too) to perform keystroke injection attacks (via Rubber Ducky scripts) simply over wireless interface. In this tutorial I want to show you the first important steps before you can start the penetration testing. The cables, programmer and other awesome MG products are available from Hak5.

Important: You should own (or buy) at least one O.MG Cable Programmer, otherwise you will not be able to follow the steps below!

Preparation

First check whether Python 3.7 (or higher) and pyserial (incl. dependencies) is installed. It is already pre-installed in my Kali Linux.

# check python version
$ python3 --version
Python 3.8.6

# check for python package
$ pip3 freeze | grep 'pyserial'
pyserial==3.5b0

If you still need to install the necessary packages.

# install needed python package(s)
$ sudo pip3 install pyserial

Download the latest O.MG Firmware (incl. needed scripts/binaries) now.

# download latest Firmware via CURL
$ curl -L -C - https://github.com/O-MG/O.MG_Cable-Firmware/releases/download/v1.5.3/O.MG_Cable-Firmware-v1.5.3.zip -o ~/Downloads/O.MG_Cable-Firmware-v1.5.3.zip

# unzip archive
$ unzip ~/Downloads/O.MG_Cable-Firmware-v1.5.3.zip -d ~/Downloads/

# list content (optional)
$ ls -la ~/Downloads/O.MG_Cable-Firmware-v1.5.3/

# list physical USB device hierarchy (optional)
$ lsusb

Install Firmware

Now plug the O.MG programmer into your computer and the O.MG cable into the programmer. This can be a bit more difficult at first, so be careful not to destroy everything right away. Even when pulling out – Treat it like a beautiful woman.

Note: If you are running Kali Linux as VM (e.g. VirtualBox), passthrough needed USB devices.

VirtualBox USB passthrough

Change into directory O.MG_Cable-Firmware-v1.5.3 and set the file permissions for file flash.py and start the Firmware configuration and setup.

# list physical USB device hierarchy (optional)
$ lsusb

# run python script
$ sudo python3 ./flash.py

Caution: If you see the following output (or similar) Connecting........_____..... but flashing the firmware ends with an error – means that the programmer was recognized correctly but the cable was not. Remove the cable and plug it in again. In addition, the cable needs a reset after every firmware flash.

If everything works (which is the normal case) you will be asked in which mode (AP or STA) the wifi should work. In my example, I am using for this tutorial the Access Point (AP) mode. So I’ll set the SSID as well as wifi credentials. You can later access with any modern browser via URL http://192.168.4.1. Whether you need AP or STA mode depends on your environment and your attack vector. But try to get to know both as well as their respective advantages and disadvantages.

SELECT WIFI MODE ...: 2
ENTER WIFI SSID ...: OMGtest
ENTER WIFI PASS ...: test12345

Confirm your entries and wait a moment. An overview is displayed (do not forget the password).

Flash Operation Complete!

[ WIFI SETTINGS ]
  WIFI_SSID: OMGtest
  WIFI_PASS: test12345
  WIFI_MODE: 2
  WIFI_TYPE: ACCESS POINT

[ FIRMWARE USED ]
  INIT: firmware/esp_init_data_default_v08.bin
  ELF0: firmware/image.elf-0x00000.bin
  ELF1: firmware/image.elf-0x10000.bin
  PAGE: firmware/page.mpfs

<<< PROCESS FINISHED, REMOVE PROGRAMMER >>>
Press Enter to continue...

That was done super quickly and easily. Now pull the cable out of the programmer and you can start.

Wifi Monitor Mode Basics

There are several ways to enable monitor mode for Wifi interfaces. Depending to your OS, installed packages, installed drivers and the Wifi model these methods are available and/or useful. In this tutorial I will explain three different ways.

3 different ways

The first example enables the monitor mode via iwconfig. To start/stop the interface the ip command is used, but you could also use ifconfig command.

# disable interface
$ ip link set wlan0 down

# enable monitor mode
$ iwconfig wlan0 mode monitor

# check interface status (optional)
$ iwconfig wlan0 | grep -i mode | awk '{print $4}'

# enable device
$ ip link set wlan0 up

The second example enables monitor mode via airmon-ng. The explicit start or stop of the interface is not necessary here. Attention, this method will change the name of the interface.

# stop interfering processes
$ airmon-ng check kill

# enable monitor mode
$ airmon-ng start wlan0

# check interface status (optional)
$ iwconfig wlan0mon | grep -i mode | awk '{print $4}'

The third example enables monitor mode via iw. To start/stop the interface the ifconfig command is used, but you could also use ip command.

# disable interface
$ ifconfig wlan0 down

# enable monitor mode
$ iw wlan0 set monitor control

# check interface status (optional)
$ iw dev | grep -i type | awk '{print $2}'

# enable device
$ ifconfig wlan0 up

It may happen that your interface crashes during the scan. In that case, you should choose a different method. If none of the shown examples works properly, it could be due to the Network Manager. In this case, turn it off. Attention, this action is then valid for all interfaces and can disturb your internet connection.

# stop network manager
$ systemctl stop NetworkManager