I know there are already a lot of tutorials for this topic, but partly incomplete or no longer up to date. That’s why I’m trying now, since software testers create very often screenshots. 😉
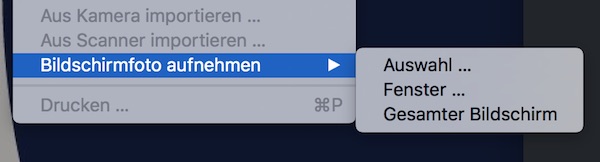
via Preview.app
The first possibility is the Preview.app … here you can easily select with the mouse what you want to do.
via Keyboard
The next possibility are shortcuts. Here you don’t need to start Preview.app!
Capture the entire screen
[Shift] + [Command] + [3]
Capture via specific selection
[Shift] + [Command] + [4]
Capture window/menu
[Shift] + [Command] + [4]
here you can press [Space] to toggle
Capture the current Touch Bar
[Shift] + [Command] + [6]
For save to clipboard press [Control] on all actions.
via Terminal
# show man-pages
$ man screencapture

# show help
$ screencapture -h

# simple jpg
$ screencapture test.jpg

# specify file type (PNG, PDF, JPG, GIF, TIFF, BMP, PSD, PCT, etc.)
$ screencapture -t tiff test.tiff

# send to the clipboard (no name)
$ screencapture -c

# use timer (10 seconds)
$ screencapture -T 10 test.jpg
Note: please see man-pages – here you find more options!
ScreenShot Settings
# change your file format
$ defaults write com.apple.screencapture type jpg

# disable shadows
$ defaults write com.apple.screencapture disable-shadow -bool true
$ killall SystemUIServer

# enable shadows
$ defaults write com.apple.screencapture disable-shadow -bool false
$ killall SystemUIServer

# set default name
$ defaults write com.apple.screencapture name "ScreenShotName"
$ killall SystemUIServer

# set no default name
$ defaults write com.apple.screencapture name ""
$ killall SystemUIServer

# default location
$ defaults write com.apple.screencapture location ~/Pictures/
$ killall SystemUIServer

# revert default location
$ defaults write com.apple.screencapture location ~/Desktop/
$ killall SystemUIServer