This tutorial shows a very simple Jenkins – jslint4java integration over Shell.
Preconditions
Jenkins is installed
Steps
Start Jenkins, open the browser (http://<host>:8080) and setup a new “Free Style Project” (JS-Lint-Example).
# start jenkins
$ service jenkins start
Back to Jenkins… here you create a “Freestyle-Project”

The tutorial does not use any VCS, so we press the “Build Now” button to create the project “workspace” folder. After successful creation, we create 3 new folders (src, lib, build) inside the workspace folder.
# create new folders inside the workspace
$ cd /var/lib/jenkins/workspace/JS-Lint-Example/
$ mkdir {src,lib,build}

# change owner of folders
$ chown jenkins:jenkins src/ lib/ build/
Now upload the jslint4java into the “lib” folder.
# upload jar to lib folder
$ scp jslint4java-2.0.5.jar <user>@<host>:/var/lib/jenkins/workspace/JS-Lint-Example/lib

# change owner and make executable
$ chown jenkins:jenkins jslint4java-2.0.5.jar
$ chmod u+x jslint4java-2.0.5.jar
It`s time to test if jslint4java is running. The 1st test can be done inside the terminal self.
$ java -jar jslint4java-2.0.5.jar --helpThe 2nd test direct on Jenkins. Open the “JS-Lint-Example” job in browser – press link “Configure” and we create a “Build-Step” with “Execute Shell”.

After save and build the “Console Output” of the respective build should show the help. If there is a problem here, please check if Java is installed and the file permissions are correct. If everything works fine we create a simple JavaScript file and upload this into the “src” folder.
function myFunction(p1, p2) {
  return p1 * p2;
}

var person = {
  firstName:"John",
  lastName:"Doe",
  age:50,
  eyeColor:"blue"
};

test = myFunction(10, 10);

document.write('Hello World');
document.write(test);
document.write(person.firstName);
# upload example.js to src folder
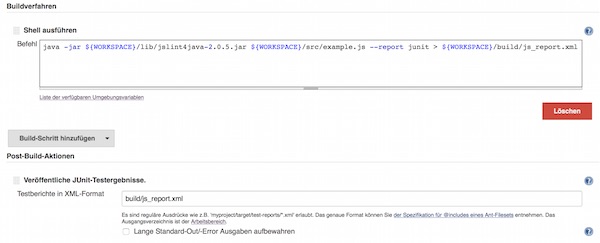
$ scp example.js <user>@<host>:/var/lib/jenkins/workspace/JS-Lint-Example/srcNow we change the “Execute Shell” command and add the “Post-Build-Action” – “Publish JUnit Test Results” with value “build/js_report.xml”.

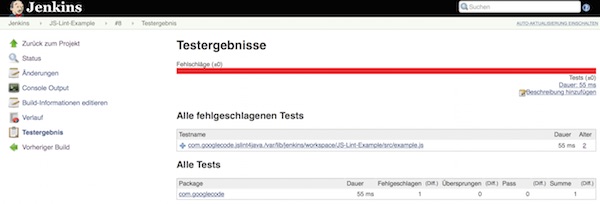
java -jar ${WORKSPACE}/lib/jslint4java-2.0.5.jar ${WORKSPACE}/src/example.js --report junit > ${WORKSPACE}/build/js_report.xmlReady,… after save and new build we can see the file “js_report.xml” into “build” folder and the jUnit report into our project.
