Using the two browsers (Firefox and Chrome), I’ll show you how to analyze the TLS traffic with Wireshark. If you only want to use one of the browsers, you can, of course.
What you need?
- Wireshark (latest version)
- Google Chrome (latest version)
- Firefox (latest version)
Let’s start
After export do not change or restart you terminal. Or set an environmental variable (global/user specific) for example in .bashrc/.bash_profile/etc. file.
# create empty file
$ touch ~/Desktop/keys.log

# create environment variable
$ export SSLKEYLOGFILE=$HOME/Desktop/keys.log

# start Firefox
$ /Applications/Firefox.app/Contents/MacOS/firefox-bin --ssl-key-log-file=$HOME/Desktop/keys.log

# start Chrome
$ /Applications/Google\ Chrome.app/Contents/MacOS/Google\ Chrome --ssl-key-log-file=$HOME/Desktop/keys.log
In another terminal, you can watch the file.
# tail file (optional)
$ tail -f ~/Desktop/keys.log
...
CLIENT_RANDOM
33da89e4b6d87d25956fd8e8c1e6965575e379ca263b145c8c1240c7f76b0d2a
348d23440ef23807a88c9bda8c8e5826316b15bba33bbfe776120fb9d711c1b04dcf8
1e99e4a58e9d0c57ac955f12a7
...
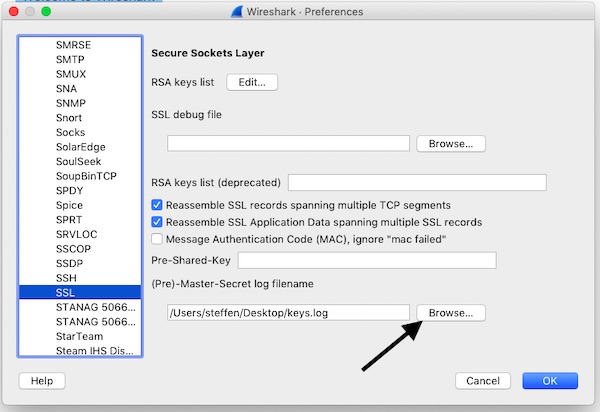
Wireshark and open Preferences -> Protocols -> SSL. Browse here for file “$HOME/Desktop/keys.log” and confirm your settings.

Start your record (may with filters) and open URL in browser. For example, you can now view the data in Wireshark via the “Decrypted SSL data” tab.