A lot of software testers do have no or less development skills. They also have less skills to use commandline tools and need GUI applications. In addition, the test applications for the respective claims should be easy to use. This guide will show you how to easily deploy software testers the needed test tools. This is just an example, please feel free to expand it!
Precondition
- PyCharm installed
- py2app
- (Virtualenv environment created)
Let`s go
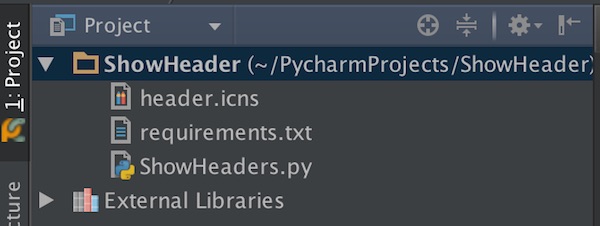
After create a new PyCharm project (with virtualenv), create 2 new empty files (requirements.txt, ShowHeaders.py) and import a icon. You can found icons (*.icns) on iconarchive for free.

Open the “requirements.txt” file and add Requests library.
requests==2.6.0
Open the “ShowHeader.py” and add the following content.
#!/usr/bin/env python
#  -*- coding: utf-8 -*-
"""
This is a main script

Usage:
    python ShowHeaders.py
"""
import requests
from Tkinter import (Tk, Frame, StringVar, OptionMenu, Button, Entry, Text,
                     END, DISABLED, NORMAL, SUNKEN, E, W)


class ShowHeaders(object):
    """
    ShowHeaders class
    """

    OPTIONS = ["GET", "POST", "PUT", "DELETE"]

    def __init__(self):
        """
        Constructor for Tk GUI
        """
        self.root = Tk()
        self.root.title('Show Headers')
        self.root.configure(bg="light blue")
        self.option = StringVar(self.root)
        self.option.set(self.OPTIONS[0])
        self.methods = None
        self.url = None
        self.response = None
        self.copy = None

    def create_gui(self):
        """
        Create Tk GUI
        """
        self._create_top_frame()
        self._create_middle_frame()
        self._create_bottom_frame()
        self.root.mainloop()

    def close_app(self):
        """
        Close & Quit Application
        """
        self.root.quit()

    def _print_response(self, response_txt):
        """
        Print response
        """
        self.response.config(state=NORMAL)
        self.response.delete(1.0, END)
        self.response.insert(END, response_txt)
        self.response.config(state=DISABLED)

    def _copy_to_clipboard(self):
        """
        Copy to text clipboard
        """
        text = self.response.get("1.0", END)
        self.root.clipboard_clear()
        self.root.clipboard_append(text)

    def _make_request(self):
        """
        Run http request and print
        """
        self.copy.config(state="normal")
        methods = self.option.get()
        url = self.url.get()
        if methods == 'GET':
            req = requests.get(url)
        elif methods == 'POST':
            req = requests.post(url)
        elif methods == 'PUT':
            req = requests.put(url)
        elif methods == 'DELETE':
            req = requests.delete(url)
        else:
            req = dict()
        header = req.headers
        self._print_response(header)

    def _create_top_frame(self):
        """
        Create top frame
        """
        top_frame = Frame(self.root)
        top_frame.grid(row=0, column=0, padx=5, pady=5, sticky=W+E)

        self.methods = OptionMenu(top_frame, self.option, *self.OPTIONS)
        self.methods.config(width=15)
        self.methods.grid(row=0, column=0)

        self.url = Entry(top_frame, width=50)
        self.url.insert(0, "http://")
        self.url.grid(row=0, column=1)

        Button(top_frame, text='Request', command=self._make_request).grid(
            row=0, column=2)

    def _create_middle_frame(self):
        """
        Create middle frame
        """
        middle_frame = Frame(self.root, height=75, bd=1, relief=SUNKEN)
        middle_frame.grid(row=1, column=0, padx=5, pady=5)

        self.response = Text(middle_frame, height=10)
        self.response.config(state=DISABLED)
        self.response.grid(row=1)

    def _create_bottom_frame(self):
        """
        Create bottom frame
        """
        bottom_frame = Frame(self.root)
        bottom_frame.grid(row=2, column=0, padx=5, pady=5, sticky=W+E)

        self.copy = Button(bottom_frame, text="Copy", state=DISABLED,
                           command=self._copy_to_clipboard)
        self.copy.grid(row=0, column=0)

        Button(bottom_frame, text='Quit', command=self.close_app).grid(
            row=0, column=1)


if __name__ == '__main__':
    APP = ShowHeaders()
    APP.create_gui()
For first test, run the application. If there are no issues – open the PyCharm terminal and run the following command.
$ py2applet --make-setup ShowHeaders.py

# or if you use virtualenv
$ /Users/<username>/ShowHeaderEnv/bin/py2applet --make-setup ShowHeaders.py
Now you should see the generated file “setup.py” in the Project. Open the file and add the icon. The content should look like this:
"""
This is a setup.py script generated by py2applet

Usage:
    python setup.py py2app
"""

from setuptools import setup

APP = ['ShowHeaders.py']
DATA_FILES = []
OPTIONS = {'argv_emulation': True, 'iconfile':'header.icns'}

setup(
    app=APP,
    data_files=DATA_FILES,
    options={'py2app': OPTIONS},
    setup_requires=['py2app'],
)
Now execute the following command to build, for first test.
$ python setup.py py2app -A
After some messages in terminal, your Project should show 2 new folders (build, dist). The alias mode (-A / –alias) instructs py2app to build an application, but it is not portable to other machines! You can open the Application in Finder or from terminal for your tests. If there are changes, just run the build-command again.
$ open dist/ShowHeaders.app
If everything is fine and your Application is ready for ship, run the following command.
# remove build and dist folder
$ rm -fr build/ dist/

# build application
$ python setup.py py2app
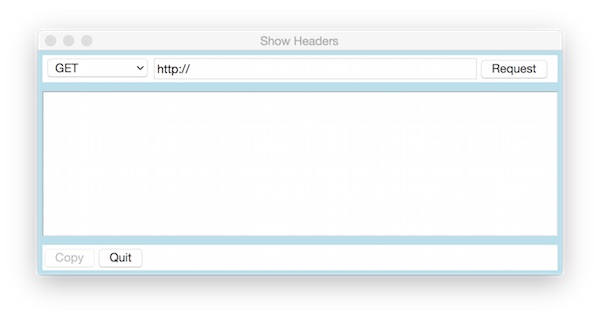
Again the Application can be found on folder “dist”. The result should look like this:

Have fun and be creative! Too ship the test application for Windows users, look at py2exe.