Create private docker registry with UI

Today I’ll show you how to create a private Docker registry. Note however you should use it only for development and testing purposes!

Preconditions

Preparation

# create new vms my-registry and my-workspace
$ docker-machine create -d virtualbox my-registry && docker-machine create -d virtualbox my-workspace

# show created vms 
$ docker-machine ls

NAME           ACTIVE   DRIVER       STATE     URL                         SWARM   DOCKER    ERRORS  
my-registry    -        virtualbox   Running   tcp://192.168.99.100:2376           v1.11.0   
my-workspace   -        virtualbox   Running   tcp://192.168.99.101:2376           v1.11.0

Create and run Docker registry container

# pointing shell to my-registry
$ eval $(docker-machine env my-registry)

# create new container (registry version 2)
$ docker run -d -p 5000:5000 --name registry-v2 --restart=always registry:2

# show created container on my-registry
$ docker ps -a

Prepare and push into registry

# ssh into my-workspace
$ docker-machine ssh my-workspace

# modify profile
$ sudo vi /var/lib/boot2docker/profile

# add new content like:
EXTRA_ARGS='
--label provider=virtualbox
--insecure-registry 192.168.99.100:5000
'

# close ssh
$ exit

# restart my-workspace
$ docker-machine restart my-workspace

# pointing shell to my-workspace
$ eval $(docker-machine env my-workspace)

# pull a public image
$ docker pull centos:centos7

# create new tag
$ docker tag centos:centos7 192.168.99.100:5000/lupin/centos7

# show images (2 images should be there)
$ docker images

# push image
$ docker push 192.168.99.100:5000/lupin/centos7

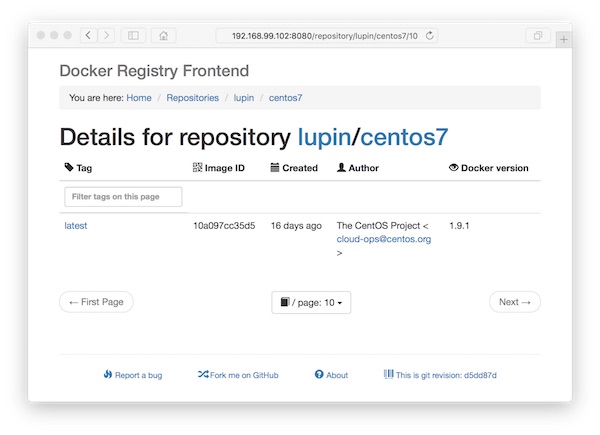
Create registry Browser-UI

# create new vm my-registry-gui
$ docker-machine create -d virtualbox my-registry-gui

# pointing shell to my-registry-gui
$ eval $(docker-machine env my-registry-gui)

# create new container
$ docker run -d -p 8080:80 -e ENV_DOCKER_REGISTRY_HOST=192.168.99.100 -e ENV_DOCKER_REGISTRY_PORT=5000 --name registry-v2-gui --restart=always konradkleine/docker-registry-frontend:v2

# show created container
$ docker ps -a

# show created vms
$ docker-machine ls

NAME              ACTIVE   DRIVER       STATE     URL                         SWARM   DOCKER    ERRORS
my-registry       -        virtualbox   Running   tcp://192.168.99.100:2376           v1.11.0   
my-registry-gui   *        virtualbox   Running   tcp://192.168.99.102:2376           v1.11.0   
my-workspace      -        virtualbox   Running   tcp://192.168.99.101:2376           v1.11.0

Run browser

docker registry gui

create docker swarm

In this tutorial I will show how easy it is to create a Docker Swarm.

Precondition

Instructions

# create a new cluster identifier
$ docker-machine create -d virtualbox local
$ eval "$(docker-machine env local)"

# generate discovery token
$ docker run --rm swarm create

Copy the resulting value for <TOKEN-ID>. The following commands will create a Swarm cluster.

# create swarm master
$ docker-machine create -d virtualbox --swarm --swarm-discovery token://<TOKEN-ID> --swarm-master swarm-manager

# create swarm nodes
$ docker-machine create -d virtualbox --swarm --swarm-discovery token://<TOKEN-ID> swarm-node-01
$ docker-machine create -d virtualbox --swarm --swarm-discovery token://<TOKEN-ID> swarm-node-02
$ docker-machine create -d virtualbox --swarm --swarm-discovery token://<TOKEN-ID> swarm-node-03

# delete unused cluser identifier vm
$ docker-machine rm local

# pointing shell to swarm master
$ eval $(docker-machine env --swarm swarm-manager)

# show information
$ docker-machine ls
$ docker info

docker-machine the easy way of administration

The docker-machine command offers very cool features in order to operate with Docker images/container. The first basic features I would like to present in this tutorial.

Preconditions

Preparation

# start VM
MBP:~ lupin$ docker-machine start apimock

# connect your shell to the machine
MBP:~ lupin$ docker-machine env apimock
MBP:~ lupin$ eval $(docker-machine env apimock)

# check status
MBP:~ lupin$ docker-machine ls

The output should now resemble the following example:

NAME      ACTIVE   DRIVER       STATE     URL                         SWARM   DOCKER    ERRORS
apimock   *        virtualbox   Running   tcp://192.168.99.100:2376           v1.11.0

Start and access Docker container

docker-machine access container

… a little hint …

docker-machine xterm

… leave container without stopping …

docker-machine leave container

Copy files

docker-machine copy

How cool is that?

Vim syntax highlighting for Dockerfiles

By default Vim offers on the Mac OS X no syntax highlighting for Dockerfiles. With a few steps you can change that. At the end of this tutorial you can also install additional PlugIns!

Prepare .vimrc

# create or modify .vimrc
$ vim ~/.vimrc
set nocompatible
filetype off

set rtp+=~/.vim/bundle/Vundle.vim
call vundle#begin()

" add plugins here...
Plugin 'VundleVim/Vundle.vim'
Plugin 'docker/docker' , {'rtp': '/contrib/syntax/vim/'}

call vundle#end()
filetype plugin indent on

set ruler
syntax enable

Install and enable PlugIns

# start Vim
$ vim

# install and enable Vim PlugIns
:PluginInstall

# quit vim
:q

# show installed Vim PlugIns (optional)
$ ls -la ~/.vim/bundle/

Share Docker Images and Container

If you want to test dockerized applications, you need to export/import Docker images or Docker containers. Therefor Docker offers various options and commands. In this tutorial i show some possibilities without Docker Hub or Docker registry.

Preconditions

Docker save and load

# show Docker images
docker@apimock:~$ docker images

# save Docker image (include parent layers, tags, versions etc.)
docker@apimock:~$ docker save api_image:latest | gzip -vc > api_image.tar.gz

# download archive from apimock
MBP:~ lupin$ scp docker@<192.168.99.100>:/home/docker/api_image.tar.gz ~/Downloads/

# create new Boot2Docker VM
MBP:~ lupin$ docker-machine create -d virtualbox apimock2

# upload archive to apimock2
MBP:~ lupin$ scp ~/Downloads/api_image.tar.gz docker@<192.168.99.101>:/home/docker/

# load archive into image
docker@apimock2:~$ cat api_image.tar.gz | docker load

# show Docker images
docker@apimock2:~$ docker images

# show Docker image history
docker@apimock2:~$ docker history api_image

# create and start Docker container
docker@apimock2:~$ docker run --name api_container -d -p 8888:8888 api_image

Docker export and import

# show Docker containers
docker@apimock:~$ docker ps -a

# export Docker container (could running)
docker@apimock:~$ docker export api_container | gzip -vc > api_container.tar.gz

# download archive from apimock
MBP:~ lupin$ scp docker@<192.168.99.100>:/home/docker/api_container.tar.gz ~/Downloads/

# upload archive to apimock2
MBP:~ lupin$ scp ~/Downloads/api_container.tar.gz docker@<192.168.99.101>:/home/docker/

# stop and delete previous container
docker@apimock2:~$ docker kill api_container && docker rm api_container

# delete previous images
docker@apimock2:~$ docker rmi api_image

# import from archive
docker@apimock2:~$ cat api_container.tar.gz | docker import - api_image/import

# show Docker images
docker@apimock2:~$ docker images

# show Docker image history
docker@apimock2:~$ docker history api_image/import

# create and start Docker container (CMD needed)
docker@apimock2:~$ docker run --name api_container -d -p 8888:8888 api_image/import mock-server --address=0.0.0.0 --dir=api

Attention: Please note each output for “$ docker history…” !!!!

Create REST API mock server with Docker

This time again a tutorial with various instructions. It is a REST API services for development and testing purposes and some simple Docker instructions.

Preconditions

Note: For Mac OS X and Windows use Docker Toolbox!

Create and connect into Boot2Docker VM

# create new boot2docker vm
$ docker-machine create -d virtualbox apivm

# list created vm(s)
$ docker-machine ls

# list informations (optional)
$ docker-machine inspect apimock

# ssh into boot2docker vm
$ docker-machine ssh apivm

Create Dockerfile (inside VM)

# create new Dockerfile
$ vi Dockerfile
FROM ubuntu

# install python packages
RUN apt-get update && apt-get -y install python python-dev python-pip

# install python libraries
RUN pip install mock-server tornado==4.2

# create directory
RUN mkdir -p api

EXPOSE 8888

CMD ["mock-server","--address=0.0.0.0","--dir=api"]

Create Docker image and container (inside VM)

# create Docker image
$ docker build -t api_image .

# list Docker image(s)
$ docker images

# create and start new container from Docker image
$ docker run --name api_container -d -p 8888:8888 api_image

# list Docker container(s)
$ docker ps -a

Run application in browser

Now open a browser and call URL like: http://<192.168.99.100>:8888/__manage. You can now begin to create and use REST API resources.

Expand Boot2Docker – Part2

The configuration of the Boot2Docker VM, still has a few drawbacks. You can not permanently store, the root password must be set again, SSH keys always changing … and so on. In this part we will change that.

Preconditions

Create and connect HDD

# change to Default Machine Folder
$ cd VirtualBox\ VMs/

# create storage medium for VM
$ VBoxManage createhd --filename ./Boot2DockerVM/disk.vdi --size 8000

# attache storage medium to VM
$ VBoxManage storageattach "Boot2DockerVM" --storagectl "IDE" --port 1 --device 0 --type hdd --medium ./Boot2DockerVM/disk.vdi

# reconfigure boot settings of VM
$ VBoxManage modifyvm "Boot2DockerVM" --boot1 dvd --boot2 disk --boot3 none --boot4 none

# start vm
$ VBoxManage startvm Boot2DockerVM --type gui

Prepare disk

# format disk
$ mkfs.ext4 /dev/sda

# mark filesystem
$ tune2fs -L boot2docker-data /dev/sda

# restart VM
$ reboot

Set permanent root password

# check disk
$ df -h

# change directory
$ cd /mnt/sda/var/lib/boot2docker/

# create bootlocal.sh
$ vi bootlocal.sh

# content of bootlocal.sh (please use your own password)
echo "root:test123" | chpasswd

# change access rights
$ chmod +x bootlocal.sh

From this point, you can connect via SSH as root user.