Something awesome for your Docker pipelines

While my constant research for pipeline tools, I have found a fantastic security scanner for Docker images. Something you could use quickly under the topic of CI/CD and DevSecOps for your development. It’s named anchore/grype and the best it’s Open source, really fast and delivers many nice options for reports.

Requirements

  • Docker installed (to pull images)

Hint: You also can load and scan *.tar archives.

Objective

Short introduction in installation and usage of Grype (locally to evaluate).

Note: The later integration into your pipelines shouldn’t be a problem. I will add the Grype repository to my watchlist and for sure try it out in my pipelines.

Installation and default configuration

This first step should only take a few minutes.

# install the latest version to /usr/local/bin
$ curl -sSfL https://raw.githubusercontent.com/anchore/grype/main/install.sh | sh -s -- -b /usr/local/bin

# install the latest version to ~/Downloads
$ curl -sSfL https://raw.githubusercontent.com/anchore/grype/main/install.sh | sh -s -- -b ~/Downloads

# move binary to /usr/local/bin/grype (if you define different location)
$ mv ~/Downloads/grype /usr/local/bin/grype

# create configuration file
$ vim ~/.grype.yaml

# show help
$ grype --help

I copied the content in short form from the official GitHub repository. You can adapt this to your needs at any time.

check-for-app-update: true
fail-on-severity: ''
output: "table"
scope: "squashed"
quiet: false
db:
  auto-update: true
  cache-dir: "~/.grype/db"
  update-url: "https://toolbox-data.anchore.io/grype/databases/listing.json"
log:
  file: ""
  level: "error"
  structured: false

Prepare the database

The Anchore Feed Service provides regular updates about publicly available vulnerabilities. In this section I will guide you to derive the updates manually.

# check database status (optional)
$ grype db status

# check feed service for new updates
$ grype db check

# run database update
$ grype db update

# verify db files (optional)
$ ls -la ~/.grype/db/

Usage examples

Even as the usage of Grype is very simple, here some short examples.

# scan image with configuration settings
$ grype node

# scans for vulnerabilities on all image layer and set output format
$ grype --scope all-layers -o cyclonedx node

# stop if a severity high is found with exit code 1
$ grype --fail-on high node

# show last exit status (optional)
$ echo $?

To stop your validation/pipeline on certain severities of security risks (exit code 1), you can choose between following options: negligible, low, medium, high & critical.

Hint: To save the reports you could use the redirect, to the output stream to a file.

Clean up

Don’t forget to clean up your system!

# list all Docker images (optional)
$ docker images

# delete specific Docker image by name
$ docker rmi node
GitLab and Sitespeed.io

Within this tutorial I will explain shortly the combination of GitLab and Sitespeed.io. Normally GitLab provides this feature (Browser Performance Testing) but only with Premium or Silver editions. I imagine for this example that you know already the basics about GitLab pipelines, Docker in Docker and Sitespeed.io.

Preparation

As a first step you create a simple project directory with some files and one folder.

# create project directory
$ mkdir -p ~/Projects/SitespeedGitLab/ci

# change directory
cd ~/Projects/SitespeedGitLab

# create login file
$ vim ci/login.js

# create urls file
$ vim ci/urls.txt

# create pipeline file
$ vim .gitlab-ci.yml

# show structure (optional)
$ tree .
.
|__.gitlab-ci.yml
|__ci
  |__login.js
  |__urls.txt

Content of files

For the login we use the simplest version of a script which serves as pre script. You can expand it later as needed. If you do not need a login, you do not have to create this file (leave this out later in the command --preScript login.js).

module.exports = async function(context, commands) {

  // navigate to login page
  await commands.navigate('your domain');

  // add values into input fields
  await commands.addText.byId('username', 'input by id');
  await commands.addText.byId('password', 'input by id');

  // find the submit button and click it
  await commands.click.byClassName('Button');

  // wait to verify that you are logged in (incl. max time)
  return commands.wait.byId('specific tag with id',8000);
};

Let’s get to the next file. Here you simply enter all URLs to be checked. Each line represents a URL to be checked which (in our case) always precedes the login. There is also the possibility to login once for all sub-pages as well as various actions on the pages. In this case you would have to script everything (similar to pre/post scripts).

your url one
your url two
your url three

The files urls.txt and login.js have to be mounted inside the container. Therefore we choose the folder “ci”. After the successfully execution this folder will also provide the sitespeed reports.

Pipeline

The last step is the definition of GitLab pipeline. Here now a very simple example for .gitlab-ci.yml, with only one pipeline stage (test) and job (perf_tests). You can also expand this file later as you like (It’s already possible to build Docker images inside).

stages:
  - test

variables:
  DOCKER_HOST: tcp://localhost:2375/
  DOCKER_DRIVER: overlay2
  DOCKER_TLS_CERTDIR: ""

default:
  image: docker:stable
  services:
    - name: docker:dind

perf_tests:
  stage: test
  variables:
    MOUNT_PATH: "$CI_BUILDS_DIR/ci/"
    DOCKER_IMAGE: 'sitespeedio/sitespeed.io'
    BROWSER: 'firefox'
    ITERATION: '1'
  artifacts:
    name: "performance-reports"
    paths:
      - "$CI_BUILDS_DIR/ci/sitespeed-result/your domain"
  script:
    - docker run --shm-size=1g --rm -v $MOUNT_PATH:/sitespeed.io $DOCKER_IMAGE -b $BROWSER -n $ITERATION --preScript login.js urls.txt

Okay … done. You can commit/push everything into GitLab. After successfully pipeline run you can access the reports as GitLab pipeline artifacts (but not via repository folder -> because if the job is done the container and reports are gone).

ZAP API Basics

In this tutorial, I’d like to share a few ZAP API basics. This should make it possible for anyone to integrate ZAP into various pipelines.

Requirements

  • ZAP installed
  • jq installed

Minimum configuration of ZAP

Start ZAP now, if you get asked for select the persistent session – just select option “No, I don’t want…” and press button “Start”.

Select persist ZAP Session

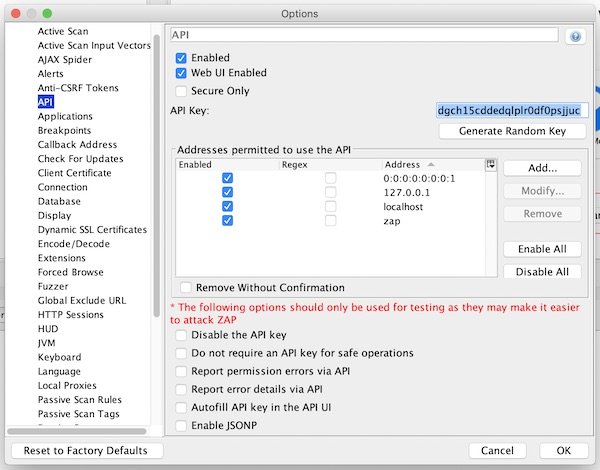
Now open “Preferences” and ensure that ZAP API is enabled.

Enable ZAP API

Our last action for configuration is to enable ZAP Proxy.

ZAP Proxy

Start ZAP via command line

# show help (macOS)
$ /Applications/OWASP\ ZAP.app/Contents/MacOS/OWASP\ ZAP.sh -h

# show default directory (macOS)
$ ls -la ~/Library/Application\ Support/ZAP/

# start ZAP in daemon mode with specific port and apikey (macOS)
$ /Applications/OWASP\ ZAP.app/Contents/MacOS/OWASP\ ZAP.sh -daemon -port 8090 -config api.key=12345

# open ZAP API in browser
$ open http://localhost:8090/UI

Add URL (Site)

# add URL
$ curl -s "http://localhost:8090/JSON/core/action/accessUrl/?apikey=12345&url=https://www.webscantest.com&followRedirects=false" | jq .

Show ZAP Sites and Hosts

# list all sites
$ curl -s "http://localhost:8090/JSON/core/view/sites/?apikey=12345" | jq .

# list all hosts
$ curl -s "http://localhost:8090/JSON/core/view/hosts/?apikey=12345" | jq .

ZAP HTTP Sessions

# list all httpSession sites
$ curl -s "http://localhost:8090/JSON/httpSessions/view/sites/?apikey=12345" | jq .

# create new httpSession
$ curl -s "http://localhost:8090/JSON/httpSessions/action/createEmptySession/?apikey=12345&site=www.webscantest.com:443&session=session1" | jq .

# show active httpSession
$ curl -s "http://localhost:8090/JSON/httpSessions/view/activeSession/?apikey=12345&site=www.webscantest.com:443" | jq .

ZAP Spider scan

# start spider scan
$ curl -s "http://localhost:8090/JSON/spider/action/scan/?apikey=12345&zapapiformat=JSON&formMethod=GET&url=https://www.webscantest.com"

# show spider scan status
$ curl -s "http://localhost:8090/JSON/spider/view/status/?apikey=12345" | jq .

ZAP Context

# list all context
$ curl -s "http://localhost:8090/JSON/context/view/contextList/?apikey=12345" | jq .

# create context
$ curl -s "http://localhost:8090/JSON/context/action/newContext/?apikey=12345&contextName=Default+Context" | jq .

# show specific context
$ curl -s "http://localhost:8090/JSON/context/view/context/?apikey=12345&contextName=Default+Context" | jq .

# add regex into includeInContext
$ curl -s "http://localhost:8090/JSON/context/action/includeInContext/?apikey=12345&contextName=Default+Context&ex=https://www.webscantest.com.*" | jq .

# list all includeRegexs
$ curl -s "http://localhost:8090/JSON/context/view/includeRegexs/?apikey=12345&contextName=Default+Context" | jq .

ZAP Active scan

# start active scan
$ curl -s "http://localhost:8090/JSON/ascan/action/scan/?apikey=12345&zapapiformat=JSON&formMethod=GET&url=https://www.webscantest.com&recurse=&inScopeOnly=false&scanPolicyName=&method=&postData=&contextId="

# show active scan status
$ curl -s "http://localhost:8090/JSON/ascan/view/status/?apikey=12345" | jq .

ZAP alerts and reports

# list alert counts by url
$ curl -s "http://localhost:8090/JSON/alert/view/alertCountsByRisk/?apikey=12345&url=https://www.webscantest.com&recurse=True" | jq .

# list alerts by risk
curl -s "http://localhost:8090/JSON/alert/view/alertsByRisk/?apikey=12345&url=https://www.webscantest.com&recurse=True" | jq .

# show json report
$ curl -s "http://localhost:8090/OTHER/core/other/jsonreport/?apikey=12345" | jq .

# list all alerts
$ curl -s "http://localhost:8090/JSON/core/view/alerts/?apikey=12345" | jq .

ZAP shutdown

# shutdown
$ curl -s "http://localhost:8090/JSON/core/action/shutdown/?apikey=12345"