Create simple CentOS 7 Virtualbox with Packer

As a software tester you need many virtual machines, the creating can be very time consuming. Of course tools like Vagrant helps a lot but the creation for BaseBoxes starts most with installation from ISO`s. Exact here helps Packer! This tutorial shows an example for CentOS7 – VirtualBox.

Preconditions

Preparation

1st you need to install Packer. The following example shows one way that works well with Mac OS X (El Capitan).

# change into Downloads
$ cd ~/Downloads/

# download packer archive (Mac OS X)
$ curl -O https://releases.hashicorp.com/packer/0.10.1/packer_0.10.1_darwin_amd64.zip

# unzip packer archive
$ unzip packer_0.10.1_darwin_amd64.zip

# move packer binary
$ sudo mv packer /usr/local/bin

# check packer version
$ packer --version

Other OS? Take a look here.

Instructions

# create new project
$ mkdir ~/Projects/PackerExample && cd ~/Projects/PackerExample

# create kickstart directory and configuration
$ mkdir ~/Projects/PackerExample/http && touch ~/Projects/PackerExample/http/ks.cfg

# create new Packer JSON file
$ touch ~/Projects/PackerExample/example.json

# how it looks (before running)
$ tree .
.
├── example.json
└── http
    └── ks.cfg
{
  "variables": {
    "iso": "http://linuxsoft.cern.ch/centos/7/isos/x86_64/CentOS-7-x86_64-Minimal-1511.iso",
    "checksum": "88c0437f0a14c6e2c94426df9d43cd67"
  },
  "builders": [
    {
      "type": "virtualbox-iso",
      "iso_url": "{{ user `iso` }}",
      "iso_checksum": "{{ user `checksum` }}",
      "iso_checksum_type": "md5",
      "vm_name": "MyCentOS7",
      "guest_os_type": "RedHat_64",
      "ssh_username": "root",
      "ssh_password": "packer",
      "ssh_port": 22,
      "ssh_wait_timeout": "600s",
      "vboxmanage": [
        ["modifyvm", "{{.Name}}", "--memory", "2048"],
        ["modifyvm", "{{.Name}}", "--cpus", "2"],
        ["modifyvm", "{{.Name}}", "--audio", "none"]
      ],
      "disk_size": "10240",
      "http_directory": "http",
      "boot_command": [
        "<tab> text ks=http://{{ .HTTPIP }}:{{ .HTTPPort }}/ks.cfg<enter><wait>"
      ],
      "shutdown_command": "/sbin/halt -p"
    }
  ]
}

More about Packer – VirtualBox? Take a look here.

install
cdrom
lang en_US.UTF-8
keyboard us
timezone UTC
network --bootproto=dhcp
rootpw --plaintext packer
user --name=frank --password=Test123
auth --enableshadow --passalgo=sha512 --kickstart
firewall --disabled
selinux --permissive
bootloader --location=mbr

text
skipx
zerombr

clearpart --all --initlabel
autopart

firstboot --disable
reboot

%packages --instLangs=en_US.utf8 --nobase --ignoremissing --excludedocs
@core
%end

%post --log=/root/ks.log
yum -y update
%end

More about CentOS 7 – Kickstart? Take a look here.

Validation and Build

# validate JSON
$ packer validate example.json

# run the build
$ packer build example.json

Result

$ tree .
.
├── example.json
├── http
│   └── ks.cfg
├── output-virtualbox-iso
│   ├── MyCentOS7-disk1.vmdk
│   └── MyCentOS7.ovf
└── packer_cache
    └── 4bbec2cca90f761e144becb1a24c2914eddd21d06292d6dfb415beb51ef9e69f.iso
Visualization of package dependencies

Documentation takes time – sometimes a lot of time. Here a few examples how to create dependencies pictures with Graphviz via command line. These commands can then be easily transferred to a build-process to save your time.

Mac OS X

# install Graphviz on Mac OS X
$ curl -O http://www.graphviz.org/pub/graphviz/stable/macos/mountainlion/graphviz-2.36.0.pkg
$ open graphviz-2.36.0.pkg

# check installation
$ dot -V
dot - graphviz version 2.36.0 (20140111.2315)

# clone PureDarwin
$ git clone https://github.com/PureDarwin/PureDarwin.git

# change directory
$ cd PureDarwin/scripts/

# create graph for non-installed mtr
$ sudo ./pd_portviz mtr

CentOS 7

# install Graphviz on CentOS 7
$ yum install -y graphviz

# check installation
$ dot -V
dot - graphviz version 2.30.1 (20150306.0020)

# install rpmdep
$ yum install -y epel-release && yum install -y rpmorphan

# create graph for installed which
$ rpmdep -dot which.dot which

Debian 8

# install Graphviz on Debian 8
$ apt-get install -y graphviz

# check installation
$ dot -V
dot - graphviz version 2.38.0 (20140413.2041)

# install debtree
$ apt-get install -y debtree

# create graph for non-installed make
$ debtree --with-suggests make > make.dot

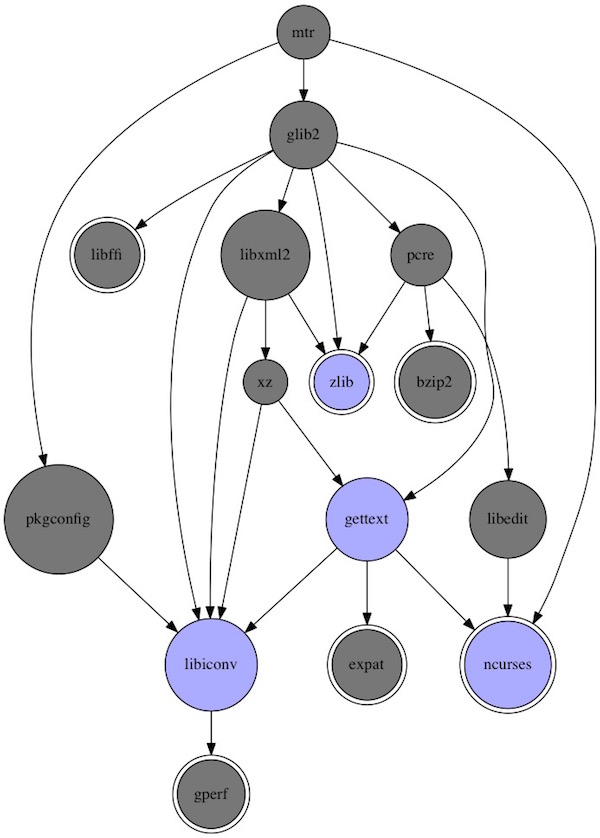
Example graph for mtr on Mac OS X

# convert .dot into png
$ dot -Tpng mtr.dot -o mtr.png

mtr dependencies

Docker Remote API and CentOS 7

This time again some topics in one tutorial. We touch Vagrant with Shell provision (external script), Docker Remote API and something CentOS 7 configuration.

Preconditions

Preparation

If you already have a CentOS 7 with Docker, you can skip these steps. Create a folder with the following 2 files…

# -*- mode: ruby -*-
# vi: set ft=ruby :

Vagrant.require_version ">= 1.8.1"
VAGRANTFILE_API_VERSION = "2"

Vagrant.configure(VAGRANTFILE_API_VERSION) do |config|

  config.vm.define "centos" do |centos|
    centos.vm.box = "centos/7"
    centos.vm.network "public_network"
    centos.vm.synced_folder ".", "/vagrant", disabled: true

    centos.vm.provider "virtualbox" do |vb|
      vb.name = "Docker-Jenkins"
      vb.cpus = "2"
      vb.memory = "2048"
    end

    centos.vm.provision "shell", path: "provision.sh"
  end
end
#!/usr/bin/env bash

yum update -y && yum install -y epel-release vim

tee /etc /yum.repos.d/docker.repo <<-'EOF'
[dockerrepo]
name=Docker Repository
baseurl=https://yum.dockerproject.org/repo/main/centos/$releasever/
enabled=1
gpgcheck=1
gpgkey=https://yum.dockerproject.org/gpg
EOF

yum install -y docker-engine jq

systemctl enable docker
systemctl start docker

Instructions

# start VM via Vagrant
$ vagrant up

# SSH into VM via Vagrant
$ vagrant ssh

# check if API is enabled (optional)
$ docker -H=tcp://127.0.0.1:4243 images

Now we edit docker.service file. The path may be different!

# find docker.service file
$ systemctl status docker

# edit docker.service
$ vim /usr/lib/systemd/system/docker.service

...
[Service]
ExecStart=
ExecStart=/usr/bin/docker daemon -H fd:// -D -H tcp://127.0.0.1:4243
...

# reload and restart docker service
$ systemctl daemon-reload && systemctl restart docker

# test docker API again
$ docker -H=tcp://127.0.0.1:4243 version

Note: Be careful if you use tcp://0.0.0.0:4243 !!!!

# some tests with curl and jq on Docker Remote API
$ curl -X GET http://127.0.0.1:4243/version | jq .
$ curl -X GET http://127.0.0.1:4243/info | jq .DriverStatus
$ curl -X GET http://127.0.0.1:4243/networks | jq '.[0]'

Read the manual of jq, the power of curl and jq together is awesome.

Add remote CentOS to docker-machine

This tutorial shows how to add a remote CentOS to your local docker-machine.

Conditions

Preparation

The first step is to install docker on CentOS 7.

# update packages
$ yum update

# change into repository directory
$ cd /etc /yum.repos.d/

# add the docker repo
$ tee docker.repo <<-'EOF'
[dockerrepo]
name=Docker Repository
baseurl=https://yum.dockerproject.org/repo/main/centos/$releasever/
enabled=1
gpgcheck=1
gpgkey=https://yum.dockerproject.org/gpg
EOF

# install docker
$ yum install docker-engine

# start docker
$ service docker start

# check version
$ docker --version && docker images

Second step is to setup firewall rules on CentOS 7.

# change firewalld
$ firewall-cmd --permanent --zone=public --add-port=2376/tcp
$ firewall-cmd --reload

# check rules
$ firewall-cmd --list-all

The last step on CentOS 7 is to share ssh public key.

# create ssh key (local)
$ ssh-keygen -t rsa -b 4096

Add CentOS 7 server to docker-machine

# list docker-machines
$ docker-machine ls

# add remote to local docker-machine
$ docker-machine create -d generic --generic-ip-address <IP | Domain> --generic-ssh-key ~/.ssh/id_rsa --generic-ssh-user <user> myServer

# pointing shell
$ eval $(docker-machine env myServer)

# list docker-machines
$ docker-machine ls
...
NAME        ACTIVE   DRIVER       STATE     URL                SWARM   DOCKER    ERRORS
myServer      *      generic      Running   tcp://<ip>:2376    v1.11.1

Create desktop environments on the fly

In this tutorial we will create desktop environments via docker on the fly. This environments could be used for development and/or testing purposes. For example you could expand it with Selenium-Grid nodes or provide manual testers all they need.

Preconditions

Steps

# create new VM
$ docker-machine create -d virtualbox xserver

# ssh into VM
$ docker-machine ssh xserver

# create Dockerfile
$ vi Dockerfile
FROM centos:centos7

MAINTAINER Lupin3000

RUN yum update -y
RUN yum install -y epel-release
RUN yum install -y x2goserver x2goserver-xsession
RUN yum groupinstall -y Xfce
RUN yum install -y firefox

RUN /usr/bin/ssh-keygen -t rsa -f /etc /ssh/ssh_host_rsa_key -N ''
RUN /usr/bin/ssh-keygen -t ecdsa -f /etc /ssh/ssh_host_ecdsa_key -N ''
RUN /usr/bin/ssh-keygen -t ed25519 -f /etc /ssh/ssh_host_ed25519_key -N ''

RUN adduser testuser
RUN echo 'testuser:test123' | chpasswd
RUN echo 'root:test123' | chpasswd

EXPOSE 22

CMD ["/usr/sbin/sshd", "-D"]

* Note: the space after etc is because of the security settings of my provider!

# build Docker image from Dockerfile
$ docker build -t centos7/xserver .

# run Docker container from image
$ docker run -p 2222:22 -d --name centos7-xserver centos7/xserver

Connect with x2go client

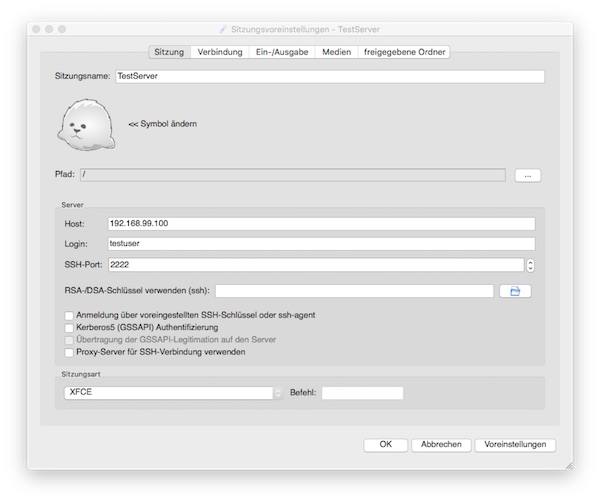
The following example shows the client configuration. Important are values ​​for host (192.168.99.100), port (2222) and session type (XFCE).

x2go client settings

Now it’s up to you to add more users, tools etc. – or to integrate everything into a build process.

Multiple hosts provisioning with Vagrant, Ansible and virtualenv

In this tutorial we use Ansible (installed in virtualenv) and Vagrant. Furthermore, we have different machines (Debian, CentOS). For all hosts we want to have Provisioning on startup and via command.

Precondition

Folder structure

.
├── Makefile
├── Vagrantfile
├── playbook.yml
├── requirements.txt
└── roles
    └── common
        └── tasks
            └── main.yml

Files

ansible
ansible-lint
VAGRANTFILE_API_VERSION = "2"
 
Vagrant.configure(VAGRANTFILE_API_VERSION) do |config|

  # CentOS 7 VM
  config.vm.define "centos" do |centos|
    centos.vm.box = "lupin/centos7"
    centos.vm.network :forwarded_port, guest: 22, host: 2221, id: 'ssh'
    centos.vm.provider "virtualbox" do |vb|
       vb.name = "CentOS7-Vagrant-Ansible"
    end
    centos.vm.provision "ansible" do |ansible|
        # ansible.verbose = "v"
        ansible.playbook = "playbook.yml"
    end
  end

  # Debian 8 VM
  config.vm.define "debian" do |debian|
    debian.vm.box = "lupin/debian8"
    debian.vm.network :forwarded_port, guest: 22, host: 2222, id: 'ssh'
    debian.vm.provider "virtualbox" do |vb|
       vb.name = "Debian-Vagrant-Ansible"
    end
    debian.vm.provision "ansible" do |ansible|
        # ansible.verbose = "v"
        ansible.playbook = "playbook.yml"
    end
  end

end
---
- hosts: all
  become: yes
  gather_facts: yes
  roles:
    - common
---
- debug: msg="System {{ ansible_distribution }}"
ENV_DIR = env
CURRENT_DIR := $(shell pwd)
INTERPRETER = $(CURRENT_DIR)/$(ENV_DIR)/bin/
PATH := ${PATH}:$(INTERPRETER)

help:
	@echo "Run make <target> with:"
	@echo " > env           : create virtualenv on folder $(ENV_DIR)"
	@echo " > deps          : install dependentcies"
	@echo " > cleanenv      : delete virtualenv"
	@echo " > start         : run vagrant up"
	@echo " > provisioning  : start ansible provisioning"
	@echo " > kill          : run vagrant destroy"

debug:
	@echo " > ansible location is     : $(INTERPRETER)"
	@echo " > environment variable is : $(PATH)"
	vagrant status

env:
	virtualenv $(ENV_DIR) && \
	. $(ENV_DIR)/bin/activate && \
	make deps

deps:
	$(ENV_DIR)/bin/pip install -r requirements.txt

cleanenv:
	rm -fr $(ENV_DIR)

start:
	vagrant up

provisioning:
	vagrant provision

kill:
	vagrant destroy -f

Usage

# create environment
$ make env

# start vagrant (create VM`s and run provisioning)
$ make start

# run provisioning (on started VM`s)
$ make provisioning

# stop vagrant (delete VM`s)
$ make kill

# delete environment
$ make cleanenv

Hint

Check out the by Vagrant generated inventory file!

$ cat .vagrant/provisioners/ansible/inventory/vagrant_ansible_inventory

Create private vagrant box repository

For various reasons it may happen that the public Vagrant box repository should not be used. But Vagrant boxes should be available on the internal network. In addition, these boxes are to be versioned. With a few steps, this can be realized by Nginx.

Preparation

Nginx

# install epel-release
$ yum install -y epel-release && yum update -y

# install nginx, and additional tools
$ yum install -y nginx vim tree

# configure nginx to be automatically started at boot 
$ systemctl enable nginx

# start nginx
$ systemctl start nginx

# create new folders
$ mkdir -p /usr/share/nginx/html/devops/vagrant/boxes

# set access rights
$ chmod 755 -R /usr/share/nginx/html/devops/

# create JSON file
$ touch /usr/share/nginx/html/devops/vagrant/centos.json

# show current state
$ tree /usr/share/nginx/html/devops/
/usr/share/nginx/html/devops/
└── vagrant
    ├── boxes
    │ └── CentOS7.box
    └── centos.json

# get sha1 checksum from box
$ sha1sum /usr/share/nginx/html/devops/vagrant/boxes/CentOS7.box

# edit JSON file
$ vim /usr/share/nginx/html/devops/vagrant/centos.json

# edit nginx conf
$ vim /etc /nginx/nginx.conf

# check nginx config
$ nginx -t

# restart nginx
$ systemctl restart nginx

# enter permissive mode
$ setenforce 0
{
    "name": "demo/centos7",
    "description": "This box contains CentOS 7 64-bit.",
    "versions": [{
        "version": "0.1.0",
        "providers": [{
                "name": "virtualbox",
                "url": "http://<target>/devops/vagrant/boxes/CentOS7.box",
                "checksum_type": "sha1",
                "checksum": "99e6d7fc44cccabdfc6ed9ce178ca65fd9dcbac8"
        }]
    }]
}
...

# resolve vagrant json file(s)
location ~ ^/devops/vagrant/$ {
    index $1.json;
    try_files $uri $uri/ $1.json =404;
    autoindex off;
}
# enable auto indexing for boxes
location ~ ^/devops/vagrant/boxes/$ {
    try_files $uri $uri/ =404;
    autoindex on;
    autoindex_exact_size on;
    autoindex_localtime on;
}
# serve json with specific header
    location ~ \.json$ {
    add_header Content-Type application/json;
}
# serve box(s) with specific header
location ~ \.box$ {
    add_header Content-Type application/octet-stream;
}

...

Client

On your browser check following URL`s before proceeding: http://<target>/devops/vagrant/centos.json and http://<target>/devops/vagrant/boxes/

# create project directory
$ mkdir ~/tutorial && cd ~/tutorial

# add base box repository
$ vagrant box add demo/centos7 http://<target>/devops/vagrant/centos.json

# list all boxes
$ vagrant box list
demo/centos7  (virtualbox, 0.1.0)

# create Vagrant project
$ vagrant init demo/centos7

Nginx (Part 2)

# edit JSON file
$ vim /usr/share/nginx/html/devops/vagrant/centos.json

Attention! I use for this demonstration the same box!

{
    "name": "demo/centos7",
    "description": "This box contains CentOS 7 64-bit.",
    "versions": [{
        "version": "0.1.0",
        "providers": [{
                "name": "virtualbox",
                "url": "http://<target>/devops/vagrant/boxes/CentOS7.box",
                "checksum_type": "sha1",
                "checksum": "99e6d7fc44cccabdfc6ed9ce178ca65fd9dcbac8"
        }]
    },{
        "version": "0.1.1",
        "providers": [{
                "name": "virtualbox",
                "url": "http://<target>/devops/vagrant/boxes/CentOS7.box",
                "checksum_type": "sha1",
                "checksum": "99e6d7fc44cccabdfc6ed9ce178ca65fd9dcbac8"
        }]
    }]
}

Client (Part 2)

# check box version
$ vagrant box outdated
A newer version of the box 'demo/centos7' is available! You currently
have version '0.1.0'. The latest is version '0.1.1'. Run
`vagrant box update` to update.

You can add now more boxes with different JSON files!

Reaver, Wash and CentOS 7

In part 3, I show how to install Reaver/Wash on CentOS 7.

Preparation

Installation

# download reaver and wash
$ wget https://reaver-wps.googlecode.com/files/reaver-1.4.tar.gz

# unzip
$ tar -zxvf reaver-1.4.tar.gz

# install reaver and wash
$ cd /reaver-1.4/src
$ ./configure
$ make install

# optional read docs
$ cat /reaver-1.4/docs/README.REAVER
$ cat /reaver-1.4/docs/README.WASH

Usage

# kill interfering processes
$ airmon-ng check kill

# set interface into monitor mode (my interface is wlp0s11u1)
$ airmon-ng start wlp0s11u1

# find WPS routers via wash
$ wash -I wlp0s11u1mon

# start reaver running
$ reaver -i wlp0s11u1mon -b <ESSID> -t 2 -vv