Vagrant and Vault

I was a little surprised why there is no Vagrant plug-in for Vault. Then I thought no matter, because the Vagrantfile is actually a Ruby script. Let me try it. I have to say right away that I’m not a Ruby developer! But here is my solution which has brought me to the goal.

Prerequisite

  • latest Vault installed (0.11.0)
  • latest Vagrant installed (2.1.3)

Prepare project and start Vault

# create new project
$ mkdir -p ~/Projects/vagrant-vault && cd ~/Projects/vagrant-vault

# create 2 empty files
$ touch vagrant.hcl Vagrantfile

# start Vault in development mode
$ vault server -dev

Here my simple vagrant policy (don’t do that in production).

path "secret/*" {
  capabilities = ["read", "list"]
}

And here is my crazy and fancy Vagrantfile

# -*- mode: ruby -*-
# vi: set ft=ruby :

require 'net/http'
require 'uri'
require 'json'
require 'ostruct'

################ YOUR SETTINGS ####################
ROLE_ID = '99252343-090b-7fb0-aa26-f8db3f5d4f4d'
SECRET_ID = 'b212fb14-b7a4-34d3-2ce0-76fe85369434'
URL = 'http://127.0.0.1:8200/v1/'
SECRET_PATH = 'secret/data/vagrant/test'
###################################################

def getToken(url, role_id, secret_id)
  uri = URI.parse(url + 'auth/approle/login')
  request = Net::HTTP::Post.new(uri)
  request.body = JSON.dump({
    "role_id" => role_id,
    "secret_id" => secret_id
  })

  req_options = {
    use_ssl: uri.scheme == "https",
  }

  response = Net::HTTP.start(uri.hostname, uri.port, req_options) do |http|
    http.request(request)
  end

  if response.code == "200"
    result = JSON.parse(response.body, object_class: OpenStruct)
    token = result.auth.client_token
    return token
  else
    return ''
  end
end

def getSecret(url, secret_url, token)
  uri = URI.parse(url + secret_url)
  request = Net::HTTP::Get.new(uri)
  request["X-Vault-Token"] = token

  req_options = {
    use_ssl: uri.scheme == "https",
  }

  response = Net::HTTP.start(uri.hostname, uri.port, req_options) do |http|
    http.request(request)
  end

  if response.code == "200"
    result = JSON.parse(response.body, object_class: OpenStruct)
    return result
  else
    return ''
  end
end

token = getToken(URL, ROLE_ID, SECRET_ID)

unless token.to_s.strip.empty?
  result = getSecret(URL, SECRET_PATH, token)
  unless result.to_s.strip.empty?
    sec_a = result.data.data.secret_a
    sec_b = result.data.data.secret_b
  end
else
  puts 'Error - please check your settings'
  exit(1)
end

Vagrant.configure("2") do |config|
  config.vm.box = "centos/7"
  config.vm.post_up_message = 'Secret A:' + sec_a + ' - Secret B:' + sec_b
end

Configure Vault

# set environment variables (new terminal)
$ export VAULT_ADDR='http://127.0.0.1:8200'

# check status (optional)
$ vault status

# create simple kv secret
$ vault kv put secret/vagrant/test secret_a=foo secret_b=bar

# show created secret (optional)
$ vault kv get --format yaml -field=data secret/vagrant/test

# create/import vagrant policy
$ vault policy write vagrant vagrant.hcl

# show created policy (optional)
$ vault policy read vagrant

# enable AppRole auth method
$ vault auth enable approle

# create new role
$ vault write auth/approle/role/vagrant token_num_uses=1 token_ttl=10m token_max_ttl=20m policies=vagrant

# show created role (optional)
$ vault read auth/approle/role/vagrant

# show role_id
$ vault read auth/approle/role/vagrant/role-id
...
99252343-090b-7fb0-aa26-f8db3f5d4f4d
...

# create and show secret_id
$ vault write -f auth/approle/role/vagrant/secret-id
...
b212fb14-b7a4-34d3-2ce0-76fe85369434
...

Run it

# starts and provisions the vagrant environment
$ vagrant up

😉 … it just works

Unseal Vault with PGP

In this tutorial I will show an example for unsealing Vault using GPG. We generate for two users the keys and each user will use them to unseal. For the storage we use Consul.

Conditions

Host Preparation

First we need to setup, configure and start Consul and Vault.

Note: Because of the security settings of my provider, spaces are after “etc”. Please delete it after copy/paste.

# create new project
$ mkdir -p ~/Projects/VaultConsulPGP/consul-data && cd ~/Projects/VaultConsulPGP

# create private/public keys
$ openssl req -newkey rsa:4096 -nodes -keyout private_key.pem -x509 -days 365 -out public_key.pem
...
Country Name (2 letter code) []:CH
State or Province Name (full name) []:Zuerich
Locality Name (eg, city) []:Winterthur
Organization Name (eg, company) []:Softwaretester
Organizational Unit Name (eg, section) []:QA
Common Name (eg, fully qualified host name) []:demo.env
Email Address []:demo@demo.env
...

# create HCL configuration
$ touch ~/Projects/VaultConsulPGP/vault.hcl

# add hosts entry
$ echo -e "127.0.0.1 demo.env\n" >> /etc /hosts

# start consul service
$ consul agent -server -bootstrap-expect 1 -data-dir $HOME/Projects/VaultConsulPGP/consul-data -ui

# start vault service
$ vault server -config $HOME/Projects/VaultConsulPGP/vault.hcl

Do not stop and/or close any terminal sessions!

ui = true

storage "consul" {
  address = "127.0.0.1:8500"
  path    = "vault"
}

listener "tcp" {
  address       = "demo.env:8200"
  tls_cert_file = "public_key.pem"
  tls_key_file  = "private_key.pem"
}

Your project folder now should look like this:

# show simple folder tree
$ find . -print | sed -e 's;[^/]*/;|____;g;s;____|; |;g'
.
|____private_key.pem
|____vault_tutorial.md
|____vault.hcl
|____consul-data
|____public_key.pem

Client Preparation

As I wrote – we need to simulate two users. Now to the Docker client’s…

# run client A
$ docker run -ti --name client_a --mount type=bind,source=$HOME/Projects/VaultConsulPGP,target=/tmp/target bitnami/minideb /bin/bash

# run client B
docker run -ti --name client_b --mount type=bind,source=$HOME/Projects/VaultConsulPGP,target=/tmp/target bitnami/minideb /bin/bash

Both client’s need similar configuration, so please execute the following steps on both containers.

# install needed packages
$ apt-get update && apt-get install -y curl unzip gnupg iputils-ping

# get host IP
$ HOST_IP=$(ping -c 1 host.docker.internal | grep "64 bytes from"|awk '{print $4}')

# add hosts entry
$ echo -e "${HOST_IP} demo.env\n" >> /etc /hosts

# download vault
$ curl -C - -k https://releases.hashicorp.com/vault/0.10.4/vault_0.10.4_linux_amd64.zip -o /tmp/vault.zip

# extract archive and move binary and clean up
$ unzip -d /tmp /tmp/vault.zip && mv /tmp/vault /usr/local/bin/ && rm /tmp/vault.zip

# generate GPG key (1x for each client)
$ gpg --gen-key
...
Real name: usera
...
Real name: userb
...
# don't set a passphrase!!!!

# export generated key (client 1)
$ gpg --export [UID] | base64 > /tmp/target/usera.asc

# export generated key (client 2)
$ gpg --export [UID] | base64 > /tmp/target/userb.asc

Your project folder now should look like this:

# show simple folder tree
$ find . -print | sed -e 's;[^/]*/;|____;g;s;____|; |;g'
.
|____private_key.pem
|____vault_tutorial.md
|____vault.hcl
|____consul-data
     |____ ...
     |____ ...
|____public_key.pem
|____usera.asc
|____userb.asc

Initialize and Unseal Vault

On the host we initialize the Vault and share unseal key’s back to the client’s.

# set environment variables
$ export VAULT_ADDR=https://demo.env:8200
$ export VAULT_CACERT=public_key.pem

# ensure proper location (host)
cd ~/Projects/VaultConsulPGP

# initialize vault
$ vault operator init -key-shares=2 -key-threshold=2 -pgp-keys="usera.asc,userb.asc"

Note: Save now all keys and share the correspondending <unseal keys> to the client’s!

Now our client’s can start the unseal of Vault. Even here, please execute the following steps on both containers.

# set environment variables
$ export VAULT_ADDR=https://demo.env:8200
$ export VAULT_CACERT=/tmp/target/public_key.pem

# decode unseal key
$ echo "<unseal key>" | base64 -d | gpg -dq

# unseal vault
$ vault operator unseal <...>

Just for information

We configured both services (Consul and Vault) with WebUI.

# open Consul in Firefox
$ open -a Firefox http://127.0.0.1:8500

# open Vault in Firefox
$ open -a Firefox https://demo.env:8200/ui

Use the “Initial Root Token” to login into Vault’s WebUI.

Hashicorp Vault SSH OTP

With Vault’s SSH secret engine you can provide an secure authentication and authorization for SSH. With the One-Time SSH Password (OTP) you don’t need to manage keys anymore. The client requests the credentials from the Vault service and (if authorized) can connect to target service(s). Vault will take care that the OTP can be used only once and the access is logged. This tutorial will provide needed steps on a simple Docker infrastructure. Attention, in that tutorial Vault and Vault-SSH-Helper are running in Development Mode – don’t do that in production!

Conditions

Vault server

Let’s start and prepare the vault service.

# run vault-service container (local)
$ docker run -ti --name vault-service bitnami/minideb /bin/bash

# install packages
$ apt-get update && apt-get install -y ntp curl unzip ssh sshpass

# download vault
$ curl -C - -k https://releases.hashicorp.com/vault/0.10.4/vault_0.10.4_linux_amd64.zip -o /tmp/vault.zip

# unzip and delete archive
$ unzip -d /tmp/ /tmp/vault.zip && rm /tmp/vault.zip

# move binary
$ mv /tmp/vault /usr/local/bin/

# start vault (development mode)
$ vault server -dev -dev-listen-address='0.0.0.0:8200'

Don’t stop or close terminal session! Open new terminal. Note: The IP’s I use in this tutorial may be different to yours.

# get IP of container (local)
$ docker inspect -f '{{ .NetworkSettings.IPAddress }}' vault-service
...
172.17.0.2
...

# run commands on container (local)
$ docker exec -ti vault-service /bin/bash

# set environment variable
$ export VAULT_ADDR='http://0.0.0.0:8200'

# enable ssh secret engine
$ vault secrets enable ssh

# create new vault role
$ vault write ssh/roles/otp_key_role key_type=otp default_user=root cidr_list=0.0.0.0/0

Target server

Now we create and configure the target service.

Note: Because of the security settings of my provider, spaces are after “etc”. Please delete it after copy/paste.

# run target-service container (local)
$ docker run -ti --name target-service bitnami/minideb /bin/bash

# install packages
$ apt-get update && apt-get install -y ntp curl unzip ssh vim

# download vault-ssh-helper
$ curl -C - -k https://releases.hashicorp.com/vault-ssh-helper/0.1.4/vault-ssh-helper_0.1.4_linux_amd64.zip -o /tmp/vault-ssh-helper.zip

# unzip and delete archive
$ unzip -d /tmp/ /tmp/vault-ssh-helper.zip && rm /tmp/vault-ssh-helper.zip

# move binary
$ mv /tmp/vault-ssh-helper /usr/local/bin/

# create directory
$ mkdir /etc /vault-ssh-helper.d

# add content to file
$ cat > /etc /vault-ssh-helper.d/config.hcl << EOL
vault_addr = "http://172.17.0.2:8200"
ssh_mount_point = "ssh"
ca_cert = "/etc /vault-ssh-helper.d/vault.crt"
tls_skip_verify = false
allowed_roles = "*"
EOL

# verify config (optional)
$ vault-ssh-helper -dev -verify-only -config=/etc /vault-ssh-helper.d/config.hcl

Pam SSHD configuration (on target server)

# modify pam sshd configuration
$ vim /etc /pam.d/sshd
...
#@include common-auth
auth requisite pam_exec.so quiet expose_authtok log=/tmp/vaultssh.log /usr/local/bin/vault-ssh-helper -dev -config=/etc /vault-ssh-helper.d/config.hcl
auth optional pam_unix.so not_set_pass use_first_pass nodelay
...

SSHD configuration (on target server)

# modify sshd_config
$ vim /etc /ssh/sshd_config
...
ChallengeResponseAuthentication yes
UsePAM yes
PasswordAuthentication no
PermitRootLogin yes
...
# start SSHD
$ /etc /init.d/ssh start

# echo some content into file (optional)
$ echo 'Hello from target-service' > /tmp/target-service

Client server

Last container is for simulating a client.

# run some-client container (local)
$ docker run -ti --name some-client bitnami/minideb /bin/bash

# install packages
$ apt-get update && apt-get install -y ntp curl unzip ssh sshpass

# download vault
$ curl -C - -k https://releases.hashicorp.com/vault/0.10.4/vault_0.10.4_linux_amd64.zip -o /tmp/vault.zip

# unzip and delete archive
$ unzip -d /tmp/ /tmp/vault.zip && rm /tmp/vault.zip

# move binary
$ mv /tmp/vault /usr/local/bin/

# set environment variable
$ export VAULT_ADDR='http://172.17.0.2:8200'

# authenticate as root (root token)
$ vault auth <root token>

Usage

Most work is already done. Now we use the demo environment.

# get container IP of target-service (local)
$ docker inspect -f '{{ .NetworkSettings.IPAddress }}' target-service
...
172.17.0.3
...

# get container IP of some-client (local)
$ docker inspect -f '{{ .NetworkSettings.IPAddress }}' some-client
...
172.17.0.4
...
# create an OTP credential (vault-service)
$ vault write ssh/creds/otp_key_role ip=172.17.0.3
$ vault write ssh/creds/otp_key_role ip=172.17.0.4

Note: Because of the security settings of my provider, spaces are after “root”. Please delete it after copy/paste.

# connect via vault SSH (vault-service)
$ vault ssh -role otp_key_role -mode otp -strict-host-key-checking=no root @172.17.0.3

# connect via vault SSH (some-client)
$ vault ssh -role otp_key_role -mode otp -strict-host-key-checking=no root @172.17.0.3

# read content of file (via SSH connections)
$ cat /tmp/target-service

# tail logfile (target-service)
$ tail -f /tmp/vaultssh.log

Start with Vault 0.10.x

HashiCorp released Vault version 0.10.x on April 2018. The 0.10.x release delivers many new features and changes (eq. K/V Secrets Engine v2, Vault Web UI, etc.). Please have a look on vault/CHANGELOG for more informations. This tiny tutorial will concentrate now on usage of Vault’s Key-Value Secrets Engine via CLI.

Preparation

# download version 0.10.3
$ curl -C - -k https://releases.hashicorp.com/vault/0.10.3/vault_0.10.3_darwin_amd64.zip -o ~/Downloads/vault.zip

# unzip and delete archive
$ unzip ~/Downloads/vault.zip -d ~/Downloads/ && rm ~/Downloads/vault.zip

# change access permissions and move binary to target
$ chmod u+x ~/Downloads/vault && sudo mv ~/Downloads/vault /usr/local/

Start Vault server in development mode

# start in simple development mode
$ vault server -dev

Do not stop the process and open new tab on terminal [COMMAND] + [t].

# set environment variable
$ export VAULT_ADDR='http://127.0.0.1:8200'

# check vault status
$ vault status

Create, Read, Update and Delete secrets

# create secret (version: 1)
$ vault kv put secret/demosecret name=demo value=secret

# list secrets (optional)
$ vault kv list secret

# read secret
$ vault kv get secret/demosecret

# read secret (JSON)
$ vault kv get --format json secret/demosecret

# update secret (version: 2)
$ vault kv put secret/demosecret name=Demo value=secret foo=bar

# read secret (latest version)
$ vault kv get secret/demosecret

# read secret (specific version)
$ vault kv get --version 1 secret/demosecret

# read secret (specific field)
$ vault kv get --field=name secret/demosecret

# delete secret (latest version)
$ vault kv delete secret/demosecret

# show metadata
$ vault kv metadata get secret/demosecret

As you can see, there are minor changes to previous versions of Vault.

Note: The API for the Vault KV secrets engine even changed.

# read (version 1)
$ curl -H "X-Vault-Token: ..." https://127.0.0.1:8200/v1/secret/demosecret

# read (version 2)
$ curl -H "X-Vault-Token: ..." https://127.0.0.1:8200/v1/secret/data/demosecret

Okay, back to CLI and some examples which are better for automation. We will use the STDIN and a simple JSON file.

# create secret (version: 1)
$ echo -n "my secret" | vault kv put secret/demosecret2 name=-

# list secrets (optional)
$ vault kv list secret

# update secret (version: 2)
$ echo -n '{"name": "other secret"}' | vault kv put secret/demosecret2 -

# create JSON file
$ echo -n '{"name": "last secret"}' > ~/Desktop/demo.json

# update secret (version: 3)
$ vault kv put secret/demosecret2 @$HOME/Desktop/demo.json

# read secrets (different versions)
$ vault kv get --version 1 secret/demosecret2
$ vault kv get --version 2 secret/demosecret2
$ vault kv get --version 3 secret/demosecret2

# delete version permanent
$ vault kv destroy --versions 3 secret/demosecret2

# show metadata
$ vault kv metadata get secret/demosecret2

Web UI

Previously the Web UI was for Enterprise only, now it has been made open source.

# open URL in browser
$ open http://localhost:8200/

Now you can use the root token to sign in.

Simple Vault introduction

Today a tiny introduction to Vault from HashiCorp. I will just show the simplest usage. But this will help to get a first idea of Vault and the features.

Requirements

Preparation

# download vault (0.8.0)
$ curl -C - -k https://releases.hashicorp.com/vault/0.8.0/vault_0.8.0_darwin_amd64.zip -o ~/Downloads/vault.zip

# unzip and delete archive
$ unzip ~/Downloads/vault.zip && rm ~/Downloads/vault.zip

# move binary to target
$ sudo mv ~/Downloads/vault /usr/local/

Start Vault Server

# start in DEV mode
$ vault server -dev
...
Root Token: 6fdbf7b1-56a2-e665-aa31-0e3b5add5b77
...

Copy Root Token value to clipboard!!!

Insomnia

Create new environment “vault” under “Manage Environments” and store here your URL as “base_url” and Root Token as “api_key”.

insomnia vault environment

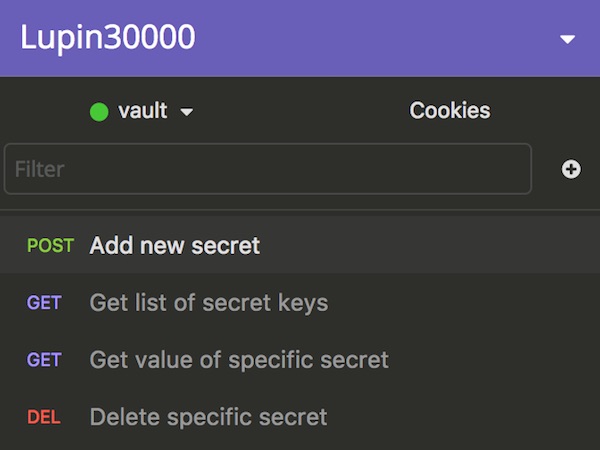
Now we create 4 simple requests

insomnia requests

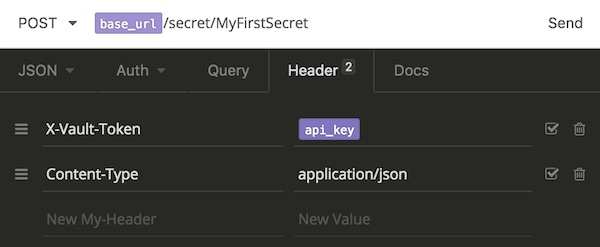
for all requests we add Header

insomnia header

For first URL (POST: Add new secret) we use “{{ base_url }}/secret/MyFirstSecret” and we add following body as JSON.

{
  "value":"myNewSecret"
}

After send the key:value is stored inside Vault. You can modify the request (e.q. “{{ base_url }}/secret/MySecondSecret”) and send some more.

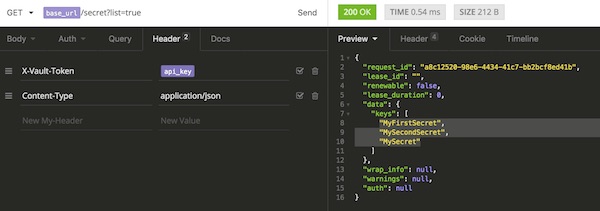
Our next request is to show all keys (GET: Get list of secret keys) “{{ base_url }}/secret?list=true”. The Preview will show similar output.

insomnia get vault keys

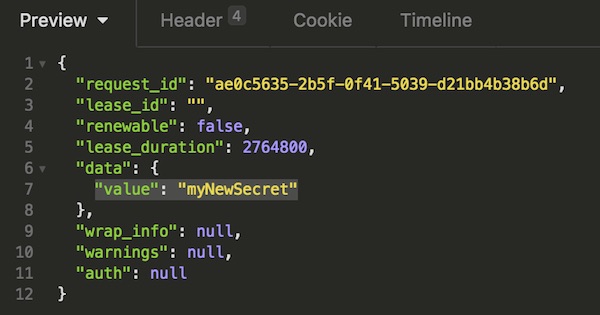
3rd request is to get the value from a specific key (GET: Get value of specific secret) “{{ base_url }}/secret/MySecret”.

insomnia get vault value

Last request is for delete (DEL: Delete specific secret) “{{ base_url }}/secret/MySecret”.

Tipp: if you lost the root token (Vault server is running) you can find the value!

# show file content
$ cat ~/.vault-token