Simple Jenkins pipeline on AWS (Part 1)

This tutorial serie should enable you to create own pipelines via Jenkins on AWS. Therefore we try to catch all needed basics with AWS IAM, EC2, ECR and ECS. Some of our configurations are recommended only for learning purpose, don’t use them on production! Why? Because these lessons are for people who starts on these topics and I will try to make all steps/configuration as easy as possible without focus on security. In this part we will create the environment and setup the “build step”.

Preconditions

  • AWS account (eq. free tier)
  • Git account (eq. GitLab, Bitbucket, GitHub, etc.)

AWS IAM

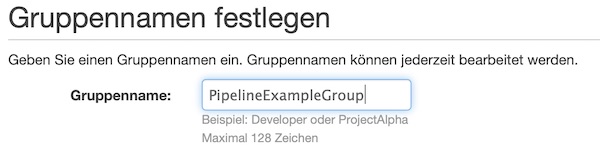
The first preparation you do on AWS IAM Management Console. Here you create and configure a new group. The benefit of this group is that you can reconfigure the policies for assigned users easily at anytime. Please name the group “PipelineExampleGroup”.

AWS IAM group name

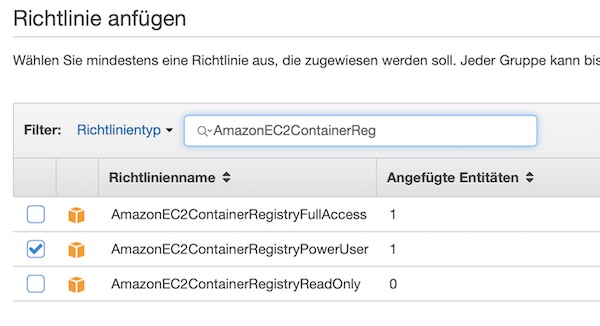
Now search for EC2 Container Registry policies and enable checkbox for “AmazonEC2ContainerRegistryPowerUser”. For our example this policy is enough, but for production please don’t do that!

AWS IAM group policies

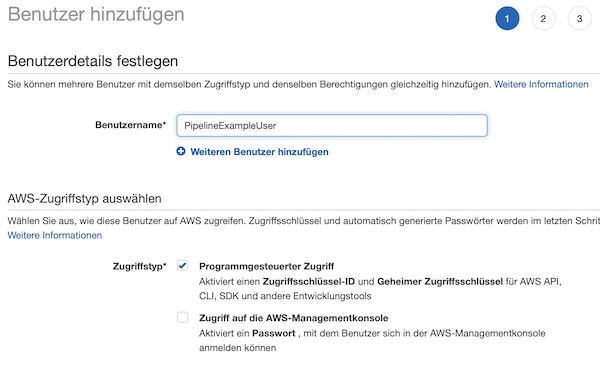
After the group is created, a user needs to be assigned to this group. Name the user “PipelineExampleUser”. Please enable checkbox “Programmatic access” for this user.

AWS IAM user name

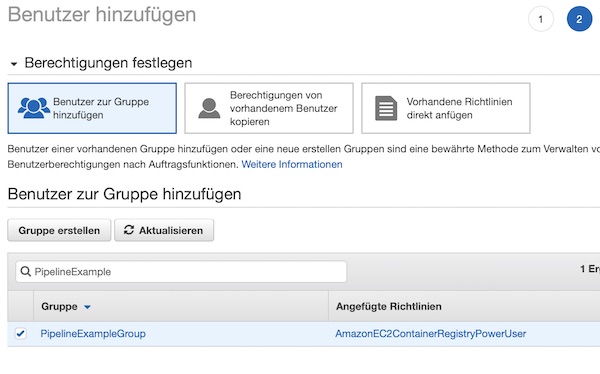
Assign the user to group.

AWS IAM user group

Before you finish the process, please choose Download .csv and then save the file to a safe location.

AWS Jenkins EC2 Instance

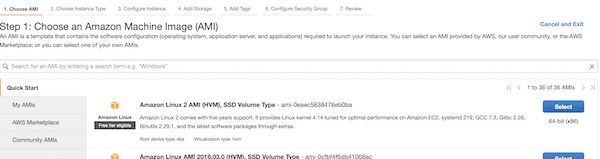
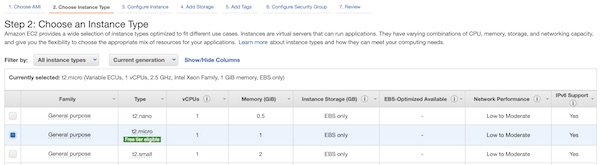
Now you can launch our EC2 instance. Do this on region “Frankfurt” (eu-central-1). Of course you can choose any other region, but please remember your choice later. At very first step select the template “Amazon Linux 2 AMI (HVM), SSD Volume Type”.

AWS EC2 AMI

The instance type “t2.micro” is enough for our example. For production you will need something else – depending to your needs.

AWS EC2 instance type

Now you need to be a little bit careful. On Instance Details step please select “Enable” for “Auto-assign Public IP” and “Stop” for “Shutdown Behavior”. For all other values the defaults should be fine. I select my default VPC and “No preference…” for Subnet.

AWS EC2 instance details

15 Gb disk space are fine. For production you need to estimate differently.

AWS EC2 instance storage

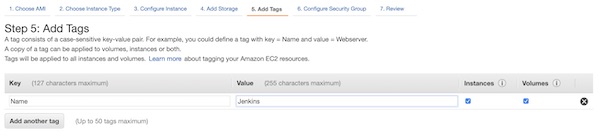
With the tag you will have it easier to identify the instance later on console view. Enter values “Name” for “Key” and “Jenkins” for “Value”.

AWS EC2 instance tags

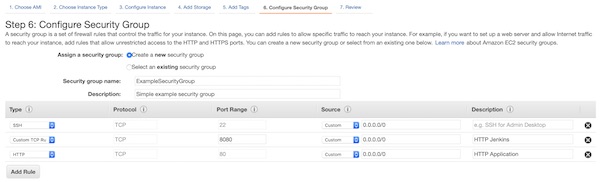
Create a new security group with name “ExampleSecurityGroup” and allow ports 22, 80 and 8080 (IPv4 only). You can change the configuration at any time later. On a production environment you should use other ports like 443 and IP restrictions.

AWS EC2 instance security group

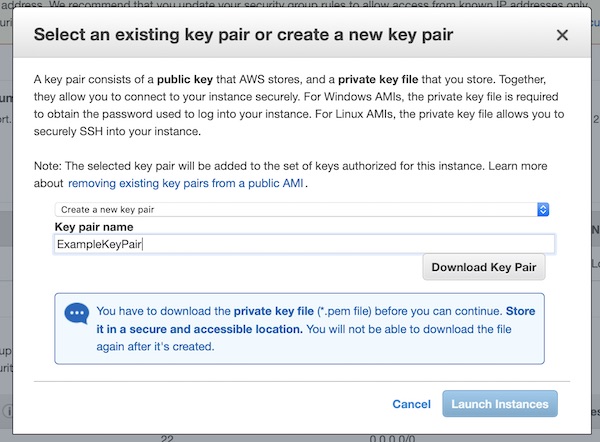
Create a new key pair with name “ExampleKeyPair”. Don’t forget to save the key (“Download Key Pair”) and press “Launch Instances”!

AWS EC2 instance key pair

Install and run Jenkins

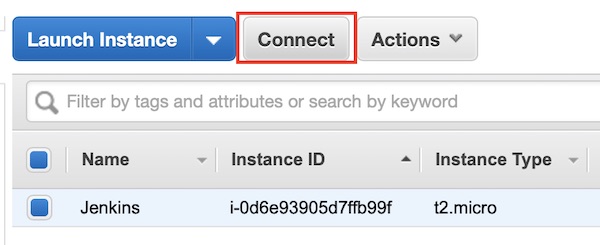
The EC2 instance is running and you can connect via SSH to start all needed installations and configurations. Attention: Your Public IP/DNS will be different (also after every stop/start), via button “Connect” you can easily figure out your configuration. I will just use the term “<EC2 IP|DNS>” in my description.

AWS EC2 connection
# move SSH keys (my are downloaded under Downloads)
$ mv ~/Downloads/ExampleKeyPair.pem.txt ~/.ssh/ExampleKeyPair.pem

# change permissions
$ chmod 0400 ~/.ssh/ExampleKeyPair.pem

# start ssh connection
$ ssh -i ~/.ssh/ExampleKeyPair.pem ec2-user@<EC2 IP|DNS>

# change to root user
$ sudo su -

# update system
$ yum update -y

# add latest Jenkins repository
$ wget -O /etc /yum.repos.d/jenkins.repo http://pkg.jenkins.io/redhat/jenkins.repo

# add key from Jenkins
$ rpm --import https://pkg.jenkins.io/redhat/jenkins.io.key

# install docker-ce
$ amazon-linux-extras install -y docker

# install java, git, jenkins and jq
$ yum install -y java git jenkins jq

# add jenkins to docker group
$ usermod -a -G docker jenkins

# enable and start docker
$ systemctl enable docker && systemctl start docker

# enable and start jenkins
$ systemctl enable jenkins && systemctl start jenkins

# get initial password
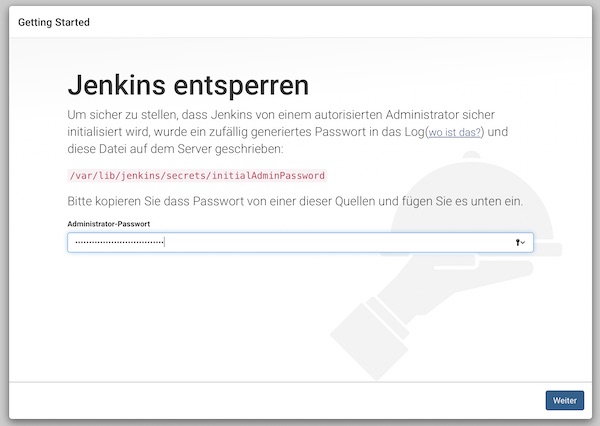
$ cat /var/lib/jenkins/secrets/initialAdminPassword

Note: I have a space after etc, because of security settings of my provider.

Do not close the SSH connection yet. Start your browser and following there the Jenkins installation steps. The URL is similar to your SSH connection – http://<EC2 IP|DNS>:8080. You should see the following screen and paste the initial password there.

jenkins screen initial password

On next screen press button “Install suggested plugins” and wait for the screen to create administrator account. Fill in your credentials and finish the installation steps. The remaining configurations (on browser) will be made later.

AWS ECR

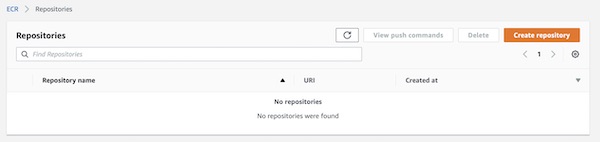
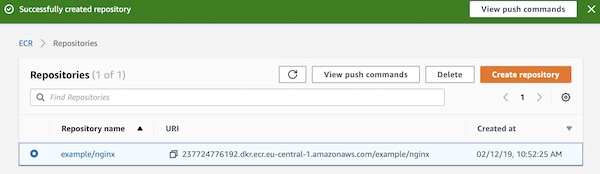
Before you can push images to ECR, you need to create a new repository. On the ECR page, choose button “Create repository”. Your AWS ECR console screen could look a little bit different.

AWS ECR repositories

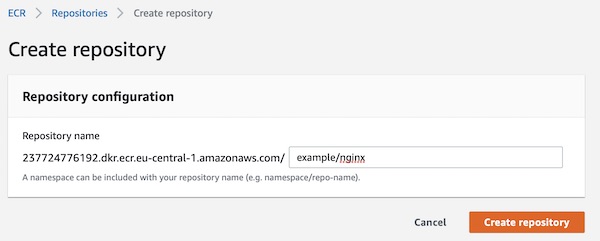
Give a repository name “example/nginx” and press button “Create repository”.

AWS ECR repository configuration

Done, your ECR repository is already created. You can see on overview page all needed informations like Repository name and URI. Your repository URI will be different to my. I will just use the term “<ECR URI>” in my description.

AWS ECR repository overview

Okay, now enable user jenkins to connect to ECR. Go back to terminal and execute following steps. You need now the credentials from downloaded csv file for “PipelineExampleUser”.

# change to jenkins user
$ su -s /bin/bash jenkins

# show docker info (optional)
$ docker info

# configure AWS-CLI options
$ aws configure
...
AWS Access Key ID [None]: <credentials.csv>
AWS Secret Access Key [None]: <credentials.csv>
Default region name [None]: eu-central-1
Default output format [None]: json
...

# list repositories in registry (optional)
$ aws ecr describe-repositories

Git Repository

I assume that you are familiar with Git. You must now create a Git Repository and create the following folders and files there. I will use my own private GitLab repository.

# show local project tree (optional)
$ tree ~/<path to your project>
|____index.html
|____Dockerfile
|____.gitignore
|____cicd
| |____build.sh
| |____Jenkinsfile
| |____deploy.sh
| |____task_definition.json
| |____test.sh
|____dev_credentials
| |____credentials.csv
|____.git

Content of files in root folder:

<!DOCTYPE html>
<html lang="en" dir="ltr">
  <head>
    <meta charset="utf-8">
    <title>DemoPipeline</title>
  </head>
  <body>
    Hello world...
  </body>
</html>
FROM nginx:stable-alpine

COPY index.html /usr/share/nginx/html/index.html
.DS_Store
dev_credentials/

Content of files in cicd folder:

pipeline {
  agent any
  parameters {
    string(name: 'REPONAME', defaultValue: 'example/nginx', description: 'AWS ECR Repository Name')
    string(name: 'ECR', defaultValue: '237724776192.dkr.ecr.eu-central-1.amazonaws.com/example/nginx', description: 'AWS ECR Registry URI')
    string(name: 'REGION', defaultValue: 'eu-central-1', description: 'AWS Region code')
    string(name: 'CLUSTER', defaultValue: 'ExampleCluster', description: 'AWS ECS Cluster name')
    string(name: 'TASK', defaultValue: 'ExampleTask', description: 'AWS ECS Task name')
  }
  stages {
    stage('BuildStage') {
      steps {
        sh "./cicd/build.sh -b ${env.BUILD_ID} -n ${params.REPONAME} -e ${params.ECR} -r ${params.REGION}"
      }
    }
    stage('DeployStage') {
      steps {
        sh "./cicd/deploy.sh"
      }
    }
    stage('TestStage') {
      steps {
        sh "./cicd/test.sh"
      }
    }
  }
}
{
    "family": "ExampleTask",
    "containerDefinitions": [
        {
            "image": "URI:NUMBER",
            "name": "ExampleContainer",
            "cpu": 0,
            "memory": 128,
            "essential": true,
            "portMappings": [
                {
                    "containerPort": 80,
                    "hostPort": 80
                }
            ]
        }
    ]
}

Note: Please set permission rights for shell scripts like $ chmod +x build.sh deploy.sh test.sh

#!/usr/bin/env bash

## shell options
set -e
set -u
set -f

## magic variables
declare REPONAME
declare ECR
declare REGION
declare BUILD_NUMBER
declare -r -i SUCCESS=0
declare -r -i NO_ARGS=85
declare -r -i BAD_ARGS=86
declare -r -i MISSING_ARGS=87

## script functions
function usage() {
  local FILE_NAME

  FILE_NAME=$(basename "$0")

  printf "Usage: %s [options...]\n" "$FILE_NAME"
  printf " -h\tprint help\n"
  printf " -n\tset ecr repository name\n"
  printf " -e\tset ecr repository uri\n"
  printf " -r\tset aws region\n"
  printf " -b\tset build number\n "
}

function no_args() {
  printf "Error: No arguments were passed\n"
  usage
  exit "$NO_ARGS"
}

function bad_args() {
  printf "Error: Wrong arguments supplied\n"
  usage
  exit "$BAD_ARGS"
}

function missing_args() {
  printf "Error: Missing argument for: %s\n" "$1"
  usage
  exit "$MISSING_ARGS"
}

## check script arguments
while getopts "hn:e:r:b:" OPTION; do
  case "$OPTION" in
    h) usage
       exit "$SUCCESS";;
    n) REPONAME="$OPTARG";;
    e) ECR="$OPTARG";;
    r) REGION="$OPTARG";;
    b) BUILD_NUMBER="$OPTARG";;
    *) bad_args;;
  esac
done

if [ "$OPTIND" -eq 1 ]; then
  no_args
fi

if [ -z "$REPONAME" ]; then
  missing_args '-n'
fi

if [ -z "$ECR" ]; then
  missing_args '-e'
fi

if [ -z "$REGION" ]; then
  missing_args '-r'
fi

if [ -z "$BUILD_NUMBER" ]; then
  missing_args '-b'
fi

## run main function
function main() {
  local LAST_ID

  # delete all previous image(s)
  LAST_ID=$(docker images -q "$REPONAME")
  if [ -n "$LAST_ID" ]; then
    docker rmi -f "$LAST_ID"
  fi

  # build new image
  docker build -t "$REPONAME:$BUILD_NUMBER" --pull=true .

  # tag image for AWS ECR
  docker tag "$REPONAME:$BUILD_NUMBER" "$ECR":"$BUILD_NUMBER"

  # basic auth into ECR
  $(aws ecr get-login --no-include-email --region "$REGION")

  # push image to AWS ECR
  docker push "$ECR":"$BUILD_NUMBER"
}

main

# exit
exit "$SUCCESS"

Inside folder “dev_credentials” I store the credentials.csv from AWS. The content of this folder will be only on my local machine, because via .gitignore I exclude the folder and files from git.

Jenkins job configuration

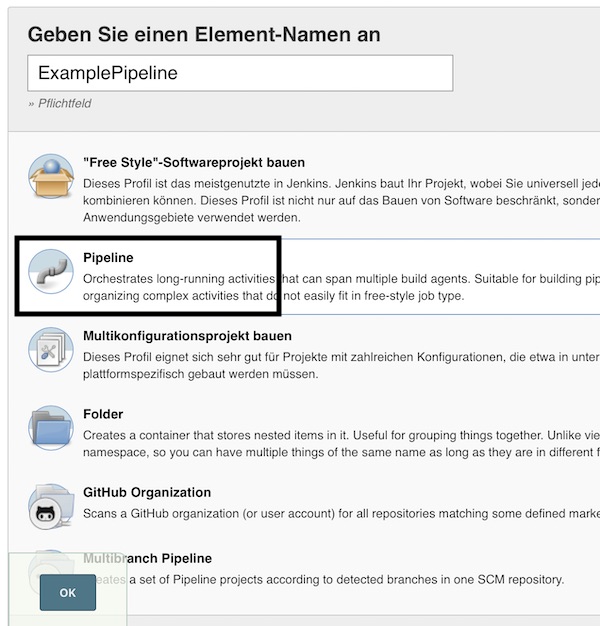
I will not use this tutorial to explain security topics for Jenkins, so we start directly with the configuration of the job (resp. project). On main page press now button “New item” or link “create new jobs”. Insert name “ExamplePipeline”, select “Pipeline” and press button “OK”.

jenkins new job

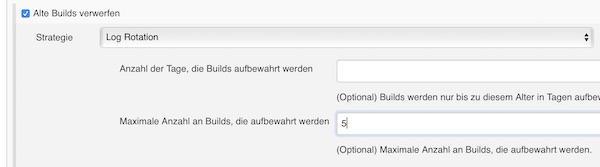
To save some disk space enable checkbox discard old builds (5 builds are enough).

jenkins job discard old builds

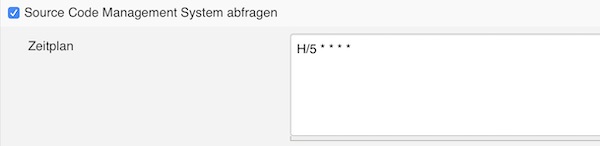
Normally you would create a webhook to trigger the build after commit, but our EC2 instance does change the public IP/DNS on every stop/start. That’s why here we check the revision changes every 5 minutes on git and trigger the job if something has changed.

jenkins job build trigger

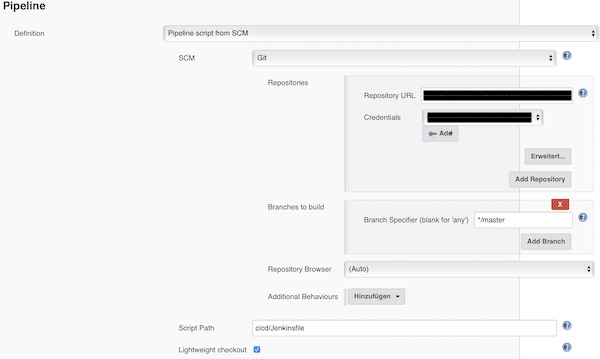
Add the repository (may credentials are needed), configure the branch and Jenkinsfile path.

jenkins job scm pipeline

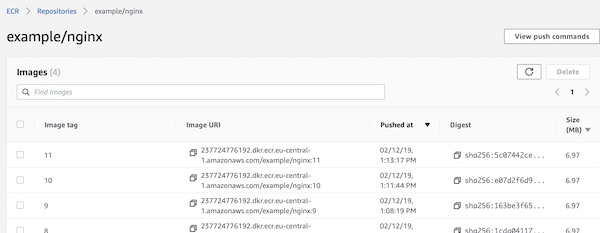
Press button “save”, _cross fingers_ and trigger manual the build. If you did nothing wrong, the job will run without issues and the ECR contains your images (depending how often you trigger the build).

AWS ECR repository images

The next part of this tutorial series will be about deployment to ECS.

File encryption/decryption using GPG

There are just too many people and organizations who are interested in our data. Thus, the secure transmission of data is important. Through encryption/decryption, data can be protected from access by third parties. There are already very long easy ways for the encryption/decryption but I have to find again and again that these are quite unknown. Herewith a little tutorial where I want to show possibilities by means of GPG.

Requirements

  • Docker (latest)

Environment preparation

By means of two Docker containers, we now want to simulate 2 persons who exchange the encrypted data.

# prepare project
$ mkdir -p ~/Projects/GPG-Example && cd ~/Projects/GPG-Example

# pull latest centos image (optional)
$ docker pull centos

# start container (user_a)
$ docker run -d -ti --name user_a --mount type=bind,source="$(pwd)",target=/share centos /bin/bash

# start container (user_b)
$ docker run -d -ti --name user_b --mount type=bind,source="$(pwd)",target=/share centos /bin/bash

# check running containers (optional)
$ docker ps -a

# enter container (user_a eq. terminal 000)
$ docker exec -ti user_a /bin/bash

# enter container (user_b eq. terminal 001)
$ docker exec -ti user_b /bin/bash

Container (user_a)

# show version (optional)
$ gpg --version

# create a simple text file
$ echo -e "Lorem ipsum dolor sit amet,\nconsetetur sadipscing elitr, sed diam nonumy eirmod tempor invidunt ut labore et dolore magna aliquyam erat,\nsed diam voluptua." > /share/example.txt

# print file in STDOUT (optional)
$ cat /share/example.txt

# symmetric encryption
$ gpg -c /share/example.txt && rm -f /share/example.txt

# check directory (optional)
$ ls -la /share/

Container (user_b)

# symmetric decryption
$ gpg -d -o /share/example.txt /share/example.txt.gpg && rm -f /share/example.txt.gpg

# print file in STDOUT (optional)
$ cat /share/example.txt

No passphrase prompt

If you want to use the encryption/decryption without prompt, for example in a bash script, you can use the following options. Depending on the version, it can come to a distinction. Option 1 is by default not available in the Docker containers.

# symmetric encryption (option 1)
$ gpg -c --pinentry-mode=loopback --passphrase "PASSWORD" /share/example.txt && rm -f /share/example.txt

# symmetric encryption (option 2)
$ echo "PASSWORD" | gpg -c --batch --passphrase-fd 0 /share/example.txt && rm -f /share/example.txt

# symmetric encryption (option 3)
$ gpg -c --batch --passphrase "PASSWORD" /share/example.txt && rm -f /share/example.txt

# symmetric decryption (option 1)
$ gpg -d --pinentry-mode=loopback --passphrase "PASSWORD" -o /share/example.txt /share/example.txt.gpg && rm -f /share/example.txt.gpg

# symmetric decryption (option 2)
$ echo "PASSWORD" | gpg -d --batch --passphrase-fd 0 -o /share/example.txt /share/example.txt.gpg && rm -f /share/example.txt.gpg

# symmetric decryption (option 3)
$ gpg -d --batch --passphrase "PASSWORD" -o /share/example.txt /share/example.txt.gpg && rm -f /share/example.txt.gpg

Multiple files

You can also use a simple loop to encrypt/decrypt multiple files. Please note the available GPG version/options. Here now a simple example without prompt.

# create 3 text files from single file
$ split -l 1 -d /share/example.txt -a 1 --additional-suffix=".txt" /share/demo_

# check directory (optional)
$ ls -la /share/

# start symmetric encryption with multiple file
$ for file in /share/demo_{0..2}.txt; do gpg -c --batch --passphrase "PASSWORD" "$file" && rm -f "$file"; done

# check directory (optional)
$ ls -la /share/

# start symmetric decryption with multiple file
$ for file in /share/demo_{0..2}.txt.gpg; do gpg -d --batch --passphrase "PASSWORD" -o "${file::-4}" "$file" && rm -f "$file"; done

# check directory (optional)
$ ls -la /share/

Encryption and Decryption via keys

Container (user_a)

# generate keys
$ gpg --gen-key
...
kind of key: 1
keysize: 2048
valid: 0
Real name: user_a
Email address: user_a@demo.tld
...

# list keys (optional)
$ gpg --list-keys

# export public key
$ gpg --armor --export user_a@demo.tld > /share/user_a.asc

Container (user_b)

# generate keys
$ gpg --gen-key
...
kind of key: 1
keysize: 2048
valid: 0
Real name: user_b
Email address: user_b@demo.tld
...

# list keys (optional)
$ gpg --list-keys

# export public key
$ gpg --armor --export user_b@demo.tld > /share/user_b.asc

Both public keys are available.

# show folder content (optional)
ls -la /share/
...
-rw-r--r-- 1 root root  156 Oct 19 12:19 example.txt
-rw-r--r-- 1 root root 1707 Oct 19 13:22 user_a.asc
-rw-r--r-- 1 root root 1707 Oct 19 13:27 user_b.asc
...

Both clients need to import the public key from other.

# user_a
$ gpg --import /share/user_b.asc

# user_b
$ gpg --import /share/user_a.asc

# list keys (optional)
$ gpg --list-keys

Our user_a now encrypt data.

# encryption for recipient
$ gpg -e -r user_b /share/example.txt && rm -f /share/example.txt

# show folder content (optional)
$ ls -la /share/

User_b now decrypt data.

# decryption
$ gpg -d -o /share/example.txt /share/example.txt.gpg && rm -f /share/example.txt.gpg

# print file in STDOUT (optional)
$ cat /share/example.txt

I hope that you have found an entry point into the topic and I have woken up your interest.

Troubleshoot SELinux Centos7 Apache

On my test environment, I had an permission denied issue with a simple HTML file. Shit all permissions looking good … but wait a minute SELinux was activated and I did not want to disable it. Here is the simple solution.

Example

# check SELinux status
$ sestatus

# check SELinux security context
$ ls -lahZ /var/www/html/
...
-rw-r--r--. root root unconfined_u:object_r:user_tmp_t:s0 demo.html
-rw-r--r--. root root unconfined_u:object_r:httpd_sys_content_t:s0 index.html
...

# change the SELinux security context (use RFILE's security context)
$ chcon --reference /var/www/html/index.html /var/www/html/demo.html

Cool … the problem is solved. All pages are visible without permission issues. It also works recursively if several files are affected.

# change security context recursive
$ chcon -Rv --type=httpd_sys_content_t /var/www/html

Vagrant and Vault

I was a little surprised why there is no Vagrant plug-in for Vault. Then I thought no matter, because the Vagrantfile is actually a Ruby script. Let me try it. I have to say right away that I’m not a Ruby developer! But here is my solution which has brought me to the goal.

Prerequisite

  • latest Vault installed (0.11.0)
  • latest Vagrant installed (2.1.3)

Prepare project and start Vault

# create new project
$ mkdir -p ~/Projects/vagrant-vault && cd ~/Projects/vagrant-vault

# create 2 empty files
$ touch vagrant.hcl Vagrantfile

# start Vault in development mode
$ vault server -dev

Here my simple vagrant policy (don’t do that in production).

path "secret/*" {
  capabilities = ["read", "list"]
}

And here is my crazy and fancy Vagrantfile

# -*- mode: ruby -*-
# vi: set ft=ruby :

require 'net/http'
require 'uri'
require 'json'
require 'ostruct'

################ YOUR SETTINGS ####################
ROLE_ID = '99252343-090b-7fb0-aa26-f8db3f5d4f4d'
SECRET_ID = 'b212fb14-b7a4-34d3-2ce0-76fe85369434'
URL = 'http://127.0.0.1:8200/v1/'
SECRET_PATH = 'secret/data/vagrant/test'
###################################################

def getToken(url, role_id, secret_id)
  uri = URI.parse(url + 'auth/approle/login')
  request = Net::HTTP::Post.new(uri)
  request.body = JSON.dump({
    "role_id" => role_id,
    "secret_id" => secret_id
  })

  req_options = {
    use_ssl: uri.scheme == "https",
  }

  response = Net::HTTP.start(uri.hostname, uri.port, req_options) do |http|
    http.request(request)
  end

  if response.code == "200"
    result = JSON.parse(response.body, object_class: OpenStruct)
    token = result.auth.client_token
    return token
  else
    return ''
  end
end

def getSecret(url, secret_url, token)
  uri = URI.parse(url + secret_url)
  request = Net::HTTP::Get.new(uri)
  request["X-Vault-Token"] = token

  req_options = {
    use_ssl: uri.scheme == "https",
  }

  response = Net::HTTP.start(uri.hostname, uri.port, req_options) do |http|
    http.request(request)
  end

  if response.code == "200"
    result = JSON.parse(response.body, object_class: OpenStruct)
    return result
  else
    return ''
  end
end

token = getToken(URL, ROLE_ID, SECRET_ID)

unless token.to_s.strip.empty?
  result = getSecret(URL, SECRET_PATH, token)
  unless result.to_s.strip.empty?
    sec_a = result.data.data.secret_a
    sec_b = result.data.data.secret_b
  end
else
  puts 'Error - please check your settings'
  exit(1)
end

Vagrant.configure("2") do |config|
  config.vm.box = "centos/7"
  config.vm.post_up_message = 'Secret A:' + sec_a + ' - Secret B:' + sec_b
end

Configure Vault

# set environment variables (new terminal)
$ export VAULT_ADDR='http://127.0.0.1:8200'

# check status (optional)
$ vault status

# create simple kv secret
$ vault kv put secret/vagrant/test secret_a=foo secret_b=bar

# show created secret (optional)
$ vault kv get --format yaml -field=data secret/vagrant/test

# create/import vagrant policy
$ vault policy write vagrant vagrant.hcl

# show created policy (optional)
$ vault policy read vagrant

# enable AppRole auth method
$ vault auth enable approle

# create new role
$ vault write auth/approle/role/vagrant token_num_uses=1 token_ttl=10m token_max_ttl=20m policies=vagrant

# show created role (optional)
$ vault read auth/approle/role/vagrant

# show role_id
$ vault read auth/approle/role/vagrant/role-id
...
99252343-090b-7fb0-aa26-f8db3f5d4f4d
...

# create and show secret_id
$ vault write -f auth/approle/role/vagrant/secret-id
...
b212fb14-b7a4-34d3-2ce0-76fe85369434
...

Run it

# starts and provisions the vagrant environment
$ vagrant up

😉 … it just works

Docker registry and Let’s Encrypt

In a previous tutorial, I showed you how to setup a insecure Docker registry. Now we will use HTTPS via certificates from Let’s Encrypt and without some insecure registry settings.

Order dedicated host

If you have a host already, skip this section. If you looking for an good and cheap dedicated host, have a look on Dedibox.

Dedibox

After successful order you can start to install CentOS (Server distributions).

install os on Dedibox

When the OS installation is done, please take care for security! On tecmint.com you can find some cool guides “The Mega Guide To Harden and Secure CentOS 7“. On official Docker docs you will found all needed steps for your Docker CE installation.

Register and configure free domain

Let’s Encrypt need a domain! Register on Freenom and order new domain for free (.tk, .ml, .ga, .cf, .gq). If you have a domain already, skip this section.

free domain

Ensure your dns is configured correctly!

Freenom dns management

Create new Let’s Encrypt certificates

Login into your host via SSH and follow next steps. Attention, replace “demotesthost.tk” by your own domain!

# install epel-release
$ yum install -y epel-release

# install certbot
$ yum install -y certbot

# show default configuration
$ firewall-cmd --list-all

# open firewall ports 80, 443
$ firewall-cmd --permanent --add-port=80/tcp
$ firewall-cmd --permanent --add-port=443/tcp

# reload firewall
$ firewall-cmd --reload

# create needed certificates
$ certbot certonly --standalone --email admin@demotesthost.tk -d demotesthost.tk

# close firewall port 80
$ firewall-cmd --permanent --remove-port=80/tcp

# reload firewall
$ firewall-cmd --reload

# list certificates (optional)
$ ls -lahG /etc /letsencrypt/archive/demotesthost.tk/

# create new directory
$ mkdir -p /opt/certs

# copy needed certificates
$ cp /etc /letsencrypt/archive/demotesthost.tk/cert1.pem /opt/certs/
$ cp /etc /letsencrypt/archive/demotesthost.tk/privkey1.pem /opt/certs/

# list certificates (optional)
$ ls -la /opt/certs/
...
-rwxrwxrwx  1 root root 1797 Feb 27 17:17 cert1.pem
-rwxrwxrwx  1 root root 1704 Feb 27 17:17 privkey1.pem

Note: The space after /etc is just because of security settings by my provider!

Run your Docker registry

# search for image (optional)
$ docker search registry
NAME              DESCRIPTION                                     STARS     OFFICIAL   AUTOMATED
registry          The Docker Registry 2.0 implementation for s…   1853      [OK]                
...

# download and run container
$ docker run -d \
  --restart=always \
  --name registry \
  -v /opt/certs:/certs \
  -e REGISTRY_HTTP_SECRET=test1234 \
  -e REGISTRY_HTTP_ADDR=0.0.0.0:5000 \
  -e REGISTRY_HTTP_TLS_CERTIFICATE=/certs/cert1.pem \
  -e REGISTRY_HTTP_TLS_KEY=/certs/privkey1.pem \
  -p 443:5000 \
  registry:2

# check logs (optional)
$ docker logs -f registry

# check container (optional)
$ docker ps -a

# connection test from local to host (optional)
$ curl -v https://demotesthost.tk/v2/_catalog

Now it’s time for push and pull a images

# pull small alpine image
$ docker pull alpine

# tag alpine image
$ docker tag alpine demotesthost.tk/myalpine

# push image to registry (try)
$ docker push demotesthost.tk/myalpine
The push refers to repository [demotesthost.tk/myalpine]
Get https://demotesthost.tk/v2/: x509: certificate signed by unknown authority

# download needed certs
$ curl -O https://letsencrypt.org/certs/isrgrootx1.pem
$ curl -O https://letsencrypt.org/certs/lets-encrypt-x3-cross-signed.pem

# open directory in Finder
$ open .

After download and open Finder, you should see similar files.

letsencrypt  CA certificates

Simply install both CA certificates via double-click.

letsencrypt certificate install

Optional you can check via “Keychain Access.app”.

Keychain Access.app

Now restart local docker and try again.

# push image
$ docker push demotesthost.tk/alpine

# check repositories via curl (optional)
$ curl https://demotesthost.tk/v2/_catalog
{"repositories":["alpine"]}

# check image tags via curl (optional)
$ curl https://demotesthost.tk/v2/alpine/tags/list
{"name":"alpine","tags":["latest"]}

# delete local images
$ docker rmi alpine
$ docker rmi demotesthost.tk/alpine

# pull image from your registry
$ docker pull demotesthost.tk/alpine

… next steps

So what about authentication? Currently everybody can upload/download images! What that means for security, should be clear. Please read the Docker docs about.

Shell linter evaluation and usage

Tomorrow, the 1st of August is a national holiday in Switzerland … So I do one day off and have some time. For a long time I wanted to deal with Shell lint. After some research, i found a few open-source tools. By the way … linters are being written for many programming languages and document formats.

Preparation

For evaluation i will not install the tools on my local system,… so Vagrant (with CentOS 7) is my choice.

# create project
$ mkdir -p ~/Projects/ShellLint && cd ~/Projects/ShellLint

# create example.sh
$ vim example.sh

# create Vagrantfile
$ vim Vagrantfile
#!/bin/bash

declare -r VERSION="1.0.0"
declare -r FILE_NAME=$(basename "$0")

function fc_usage()
{
 printf "Usage: %s" "$FILE_NAME"
 printf " [-h] [-V]\n"
}

function failure()
{
 print "here is a error"

syntax() {
 print "this line has simply to many chars ... with a simple shell lint you should see"
}

function fc_bashism()
{
 echo -e "hello world"
}

function main()
{
 fc_usage
 fc_bashism
}

exit 0
# -*- mode: ruby -*-
# vi: set ft=ruby :

Vagrant.configure("2") do |config|
  config.vm.box = "lupin/centos7"
  config.vm.box_check_update = false
  config.vm.synced_folder '.', '/vagrant', disabled: true

  config.vm.provision "file", source: "example.sh", destination: "example.sh"

  config.vm.provider "virtualbox" do |vb|
    vb.gui = false
    vb.name = "ShellLint"
    vb.memory = "1024"
    vb.cpus = 1
  end

end

Note: I created the Vagrant box “lupin/centos” via Packer … here my GitHub repository.

# create environment
$ vagrant up

# SSH into VM
$ vagrant ssh

Shell option -n

Many shell’s already offer a very simple script analysis. The option -n read commands in script, but do not execute them (syntax check).

# example bash
$ bash -n example.sh

# example shell
$ sh -n example.sh

Okay … but not really what I want… (more details are welcome)

shlint and checkbashisms

I found the repository here.

# install ruby (optional)
$ yum install -y ruby

# install json_pure (optional)
$ gem install json_pure

# install shlint
$ gem install shlint

# create config
$ echo -e 'shlint_shells="bash sh"\nshlint_debug=1' > .shlintrc

# run shlint
$ shlint example.sh

# run checkbashisms
$ checkbashisms -f example.sh

Note: for both tools you should change the shebang to “#!/bin/sh”

For shlint… I don’t get it. For checkbashisms … good if will write portable Shell scripts.

bashate

I found it here on Pypi.

# install epel repository
$ yum install -y epel-release

# install pip (python 2.x)
$ yum install -y python2-pip

# install bashate
$ pip install bashate

# run bashate
$ bashate example.sh

Nice … but not really all Standards.

Shellsheck

Shellcheck is known! Here the online service and here the repository.

# install epel repository
$ yum install -y epel-release

# update (optional)
$ yum update -y

# install ShellCheck
$ yum install -y ShellCheck

# run ShellCheck
$ shellcheck example.sh

I stay with that tool. Currently there are packages for almost every known OS.

Additional

Who knows me … knows that I do not like Installer and prefer Docker use. Here’s some fun.

# exit Vagrant and destroy
$ vagrant halt && vagrant destroy -f

# create Dockerfile
$ vim Dockerfile

# create Applescript
$ vim linter.scpt

# build Docker image
$ docker build -t alpine/shellcheck .

# change permission
$ chmod +x linter.scpt

# run Applescript
$ osascript linter.scpt
FROM alpine:latest

# install needed packages
RUN apk --update add wget

# download archive
RUN wget -q --no-check-certificate https://storage.googleapis.com/shellcheck/shellcheck-latest.linux.x86_64.tar.xz

# unzip archive
RUN tar xvfJ shellcheck-latest.linux.x86_64.tar.xz

# move binary
RUN mv /shellcheck-latest/shellcheck /usr/local/bin/shellcheck

# cleanup
RUN apk del wget
RUN rm -f shellcheck-latest.linux.x86_64.tar.xz
RUN rm -fr shellcheck-latest/

# change to mount directory
WORKDIR /mnt

# set entrypoint
ENTRYPOINT ["/usr/local/bin/shellcheck"]
#!/usr/bin/osascript

-- define global variables
global appName
global imageName

-- set magic values
set appName to "Docker"
set imageName to "alpine/shellcheck "

-- run docker linters
on LintShell(macPath)
	set posixPath to quoted form of POSIX path of macPath
	set fileName to do shell script "basename " & posixPath
	set dirName to do shell script "dirname " & posixPath
	set shellCmd to "docker run --rm -i -v " & dirName & ":/mnt " & imageName & fileName

	tell application "Terminal"
		set shell to do script shellCmd in front window
	end tell
end LintShell

-- display select box
on SelectFile()
	set dlTitle to "Nothing selected..."
	set dlMsg to "Process is terminated."

	try
		set macPath to choose file
	on error
		display dialog dlMsg buttons ["OK"] with title dlTitle
		return dlMsg
	end try

	LintShell(macPath)
end SelectFile

-- start Docker
on StartDocker()
	set dlTitle to "Docker cannot started"
	set dlMsg to "Something went wrong, could not start Docker!"

	try
		tell application appName
			activate
		end tell
	on error
		display dialog dlMsg buttons ["OK"] with title dlTitle
	end try
end StartDocker

-- check if Docker is running
on RunScript()
	set dlTitle to "Docker not running"
	set dlMsg to "Should Docker started?"

	if application appName is running then
		SelectFile()
	else
		display dialog dlMsg buttons ["OK", "No"] with title dlTitle
		if button returned of result is "OK" then
			StartDocker()
		end if
	end if
end RunScript

RunScript()

😉 just for fun…

Install Ansible inside virtualenv on CentOS7

There are many ways to install Ansible inside virtualenv on CentOS7, I would like to show now a very simple variant. Important are actually the CentOS packages at the beginning.

Steps

# install needed packages
$ yum install -y python-setuptools python-devel openssl-devel libffi-devel

# install pip
$ easy_install pip

# install virtualenv
$ pip install virtualenv

# create and activate virtualenv
$ virtualenv .env && . .env/bin/activate

# install latest ansible
(.env) [demo@centos7 ~]$ pip install ansible

# show python packages
(.env) [demo@centos7 ~]$ pip freeze
ansible==2.3.1.0
asn1crypto==0.22.0
bcrypt==3.1.3
cffi==1.10.0
cryptography==1.9
enum34==1.1.6
idna==2.5
ipaddress==1.0.18
Jinja2==2.9.6
MarkupSafe==1.0
paramiko==2.2.1
pyasn1==0.2.3
pycparser==2.17
pycrypto==2.6.1
PyNaCl==1.1.2
PyYAML==3.12
six==1.10.0

# exit virtualenv
(.env) [demo@centos7 ~]$ deactivate

it can be so easy 😉

Lunar – a UNIX security auditing tool

LUNAR is a open source UNIX security auditing tool written in Shell script. It offers the audit for various operating systems like Linux (RHEL, CentOS, Debian, Ubuntu), Solaris and Mac OS with less requirements. Services like Docker and AWS are also supported.

Download

Clone repository

# git clone
$ git clone https://github.com/lateralblast/lunar.git

Download via curl

# download via curl
$ curl -L -C - -o lunar.zip https://github.com/lateralblast/lunar/archive/master.zip

# extract archive
$ unzip lunar.zip

Usage

The use is very easy… but the outcome brings much values.

# show help
$ sh lunar.sh -h

# list functions
$ sh lunar.sh -S

# run ssh audit
$ sh lunar.sh -s audit_ssh_config

# run selinux audit in verbose mode
$ sh lunar.sh -s audit_selinux -v

# run all audits
$ sh lunar.sh -a